
Docker 详细教程
Docker
Docker 概述
Docker 是基于 Go 语言开发的开源项目!
Docker 能干嘛
之前的虚拟机技术
虚拟机技术缺点:
- 资源占用十分多
- 冗余步骤多
- 启动很慢
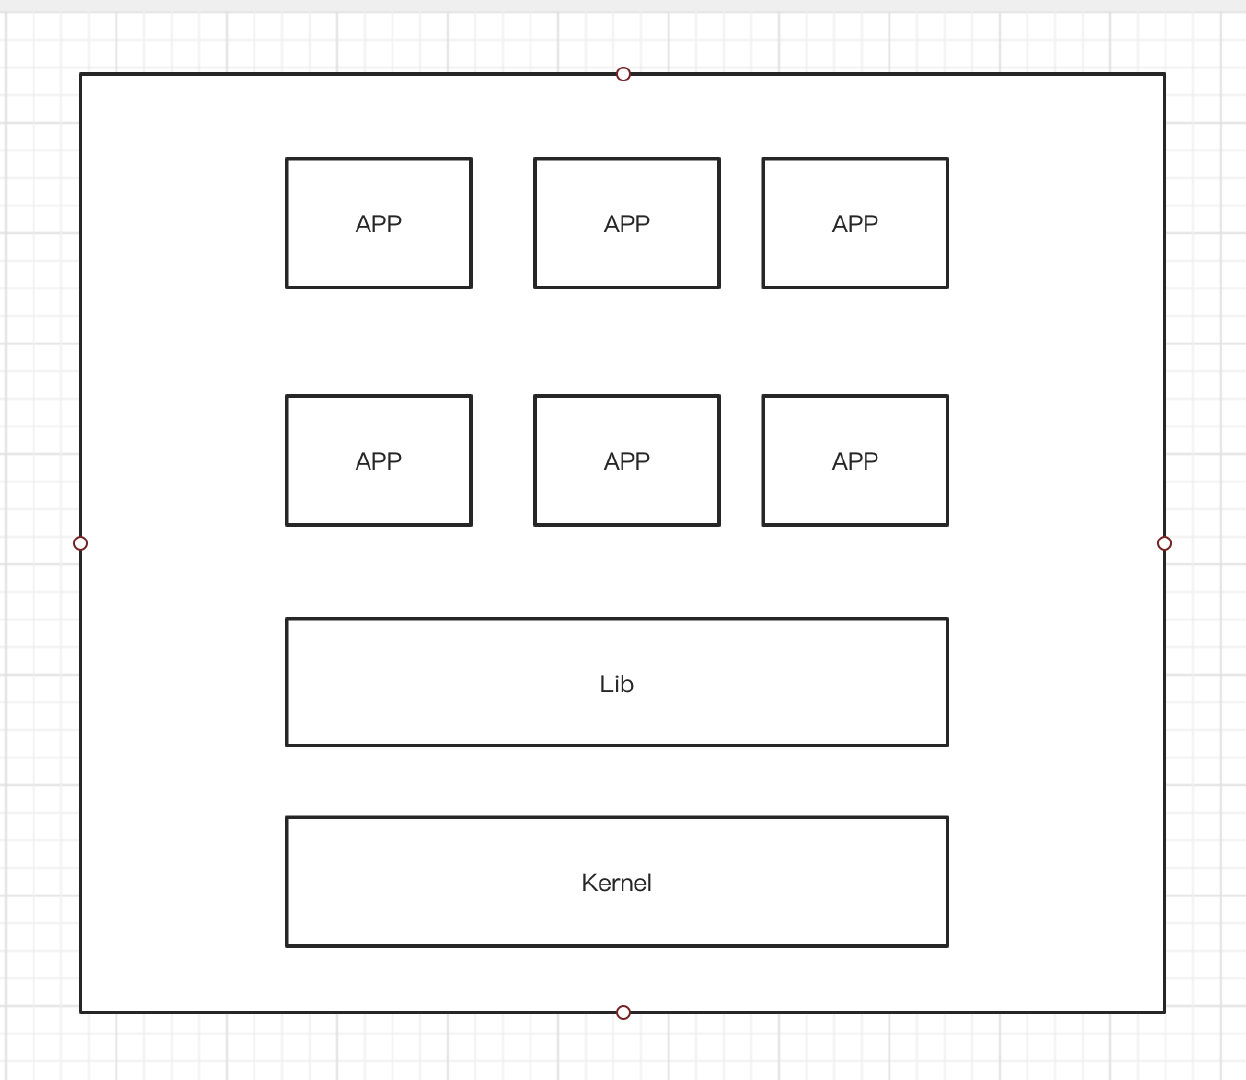
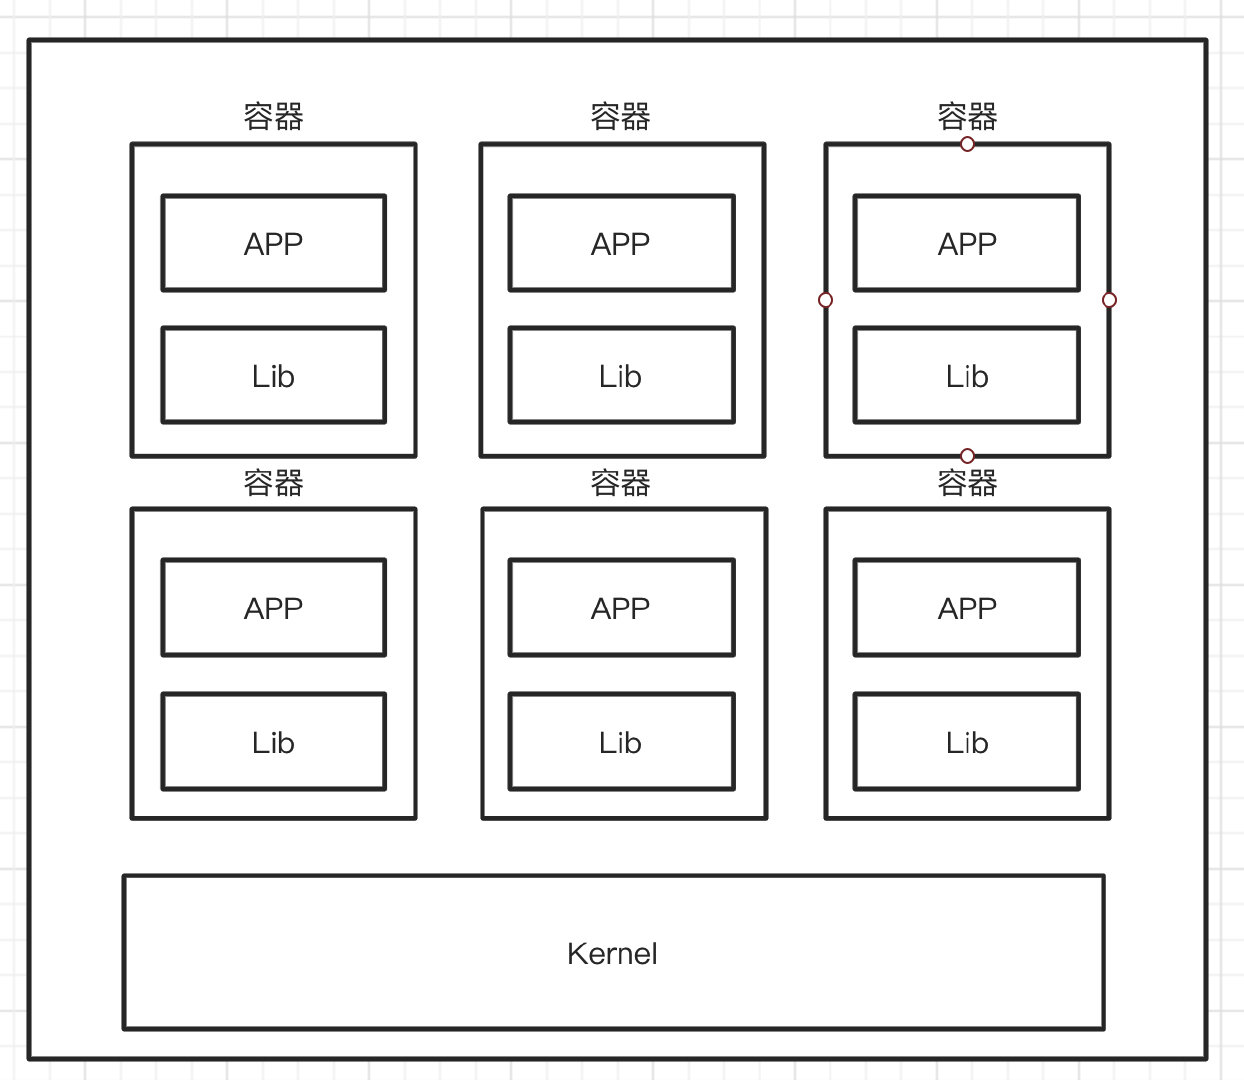
容器化技术
容器化技术不是模拟的一个完整的操作系统
比较 Docker 和 虚拟机技术的不同:
- 传统虚拟机,虚拟出一套硬件,运行一个完整的操作系统,然后在这个系统上安装和运行软件
- 容器内的应用直接运行在宿主机的内核,容器没有自己的内核,也没有虚拟硬件,所以比较轻便
- 每个容器间互相隔离,每个容器内都有一个属于自己的文件系统,互不影响
DevOps (开发、运维)
应用更快速的交付和部署
Docker:打包镜像发布测试、一键运行
更便捷的升级扩缩容
项目打包为一个镜像
更简单的系统运维
在容器化之后,开发、测试环境高度一致
更高效的计算资源利用
Docker 是内核级别的虚拟化,可以在一个物理机上运行很多的容器实例,服务器的性能可以被压榨到极致
Docker 安装
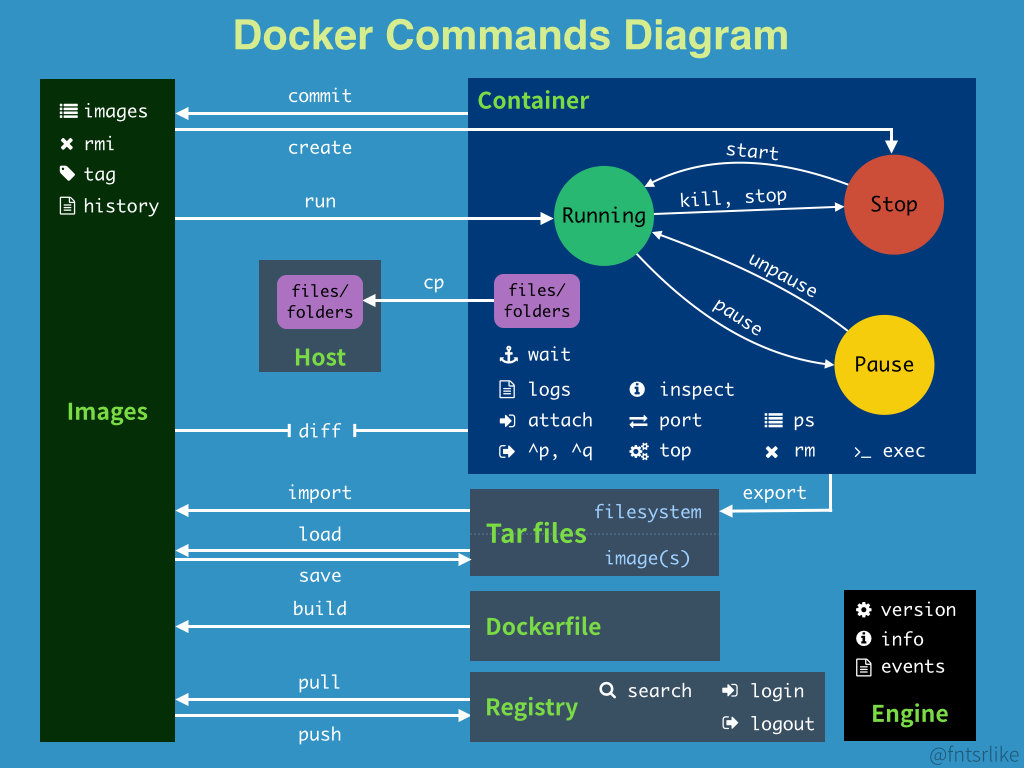
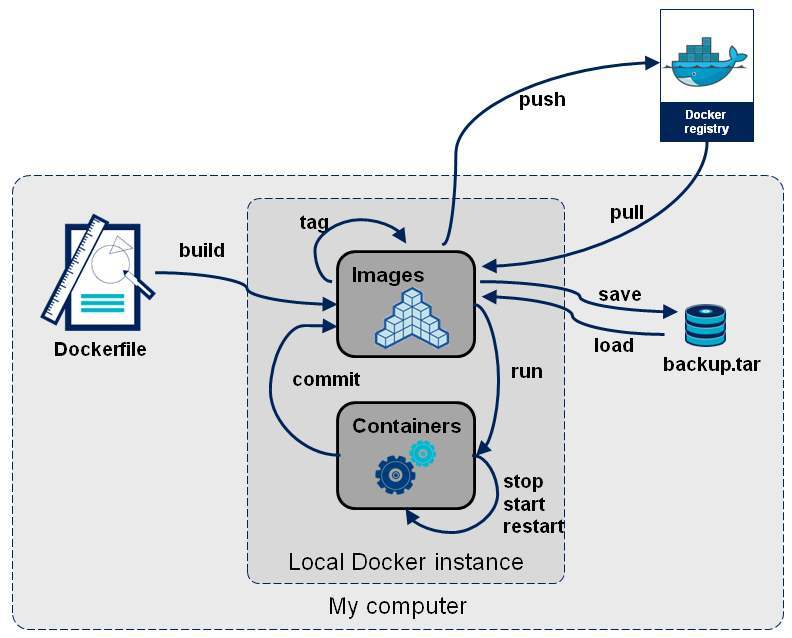
Docker 的基本组成
镜像(image):
docker 镜像就好比是一个模板,可以通过这个模板来创建容器服务,可以创建多个容器
容器(container):
docker 利用容器技术,独立运行一个或一组应用,通过镜像来创建的。
启动、停止、删除、基本命令
可以理解为一个简易的 linux 系统
仓库(repository):
存放镜像的地方,分为私有仓库和公有仓库,Docker Hub (默认是国外的)、阿里云镜像服务
配置阿里云镜像加速
安装 Docker
环境查看
1 | 系统内核是 3.10 以上的 |
1 | 系统版本 |
安装
1 | 1. 卸载旧的版本 |
1 | 8. 查看下载的 hello-world 镜像 |
卸载 docker
1 | 1. 卸载依赖 |
阿里云镜像加速
登录阿里账号
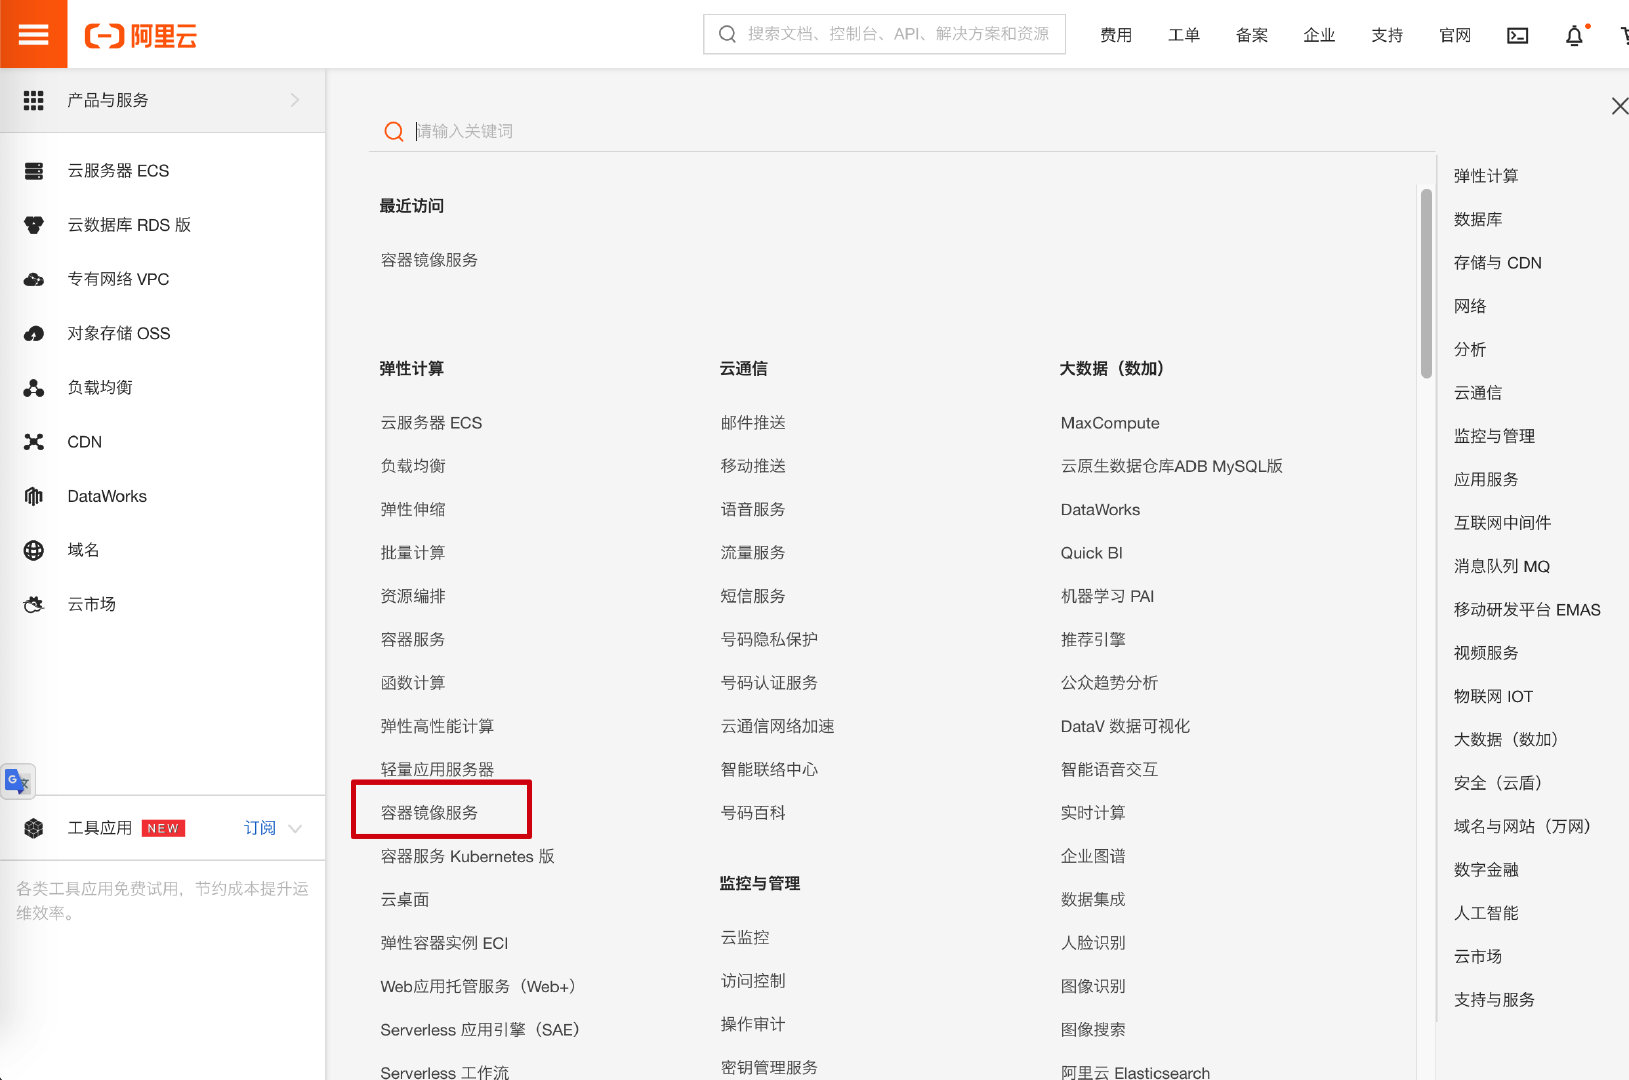
找到加速器地址
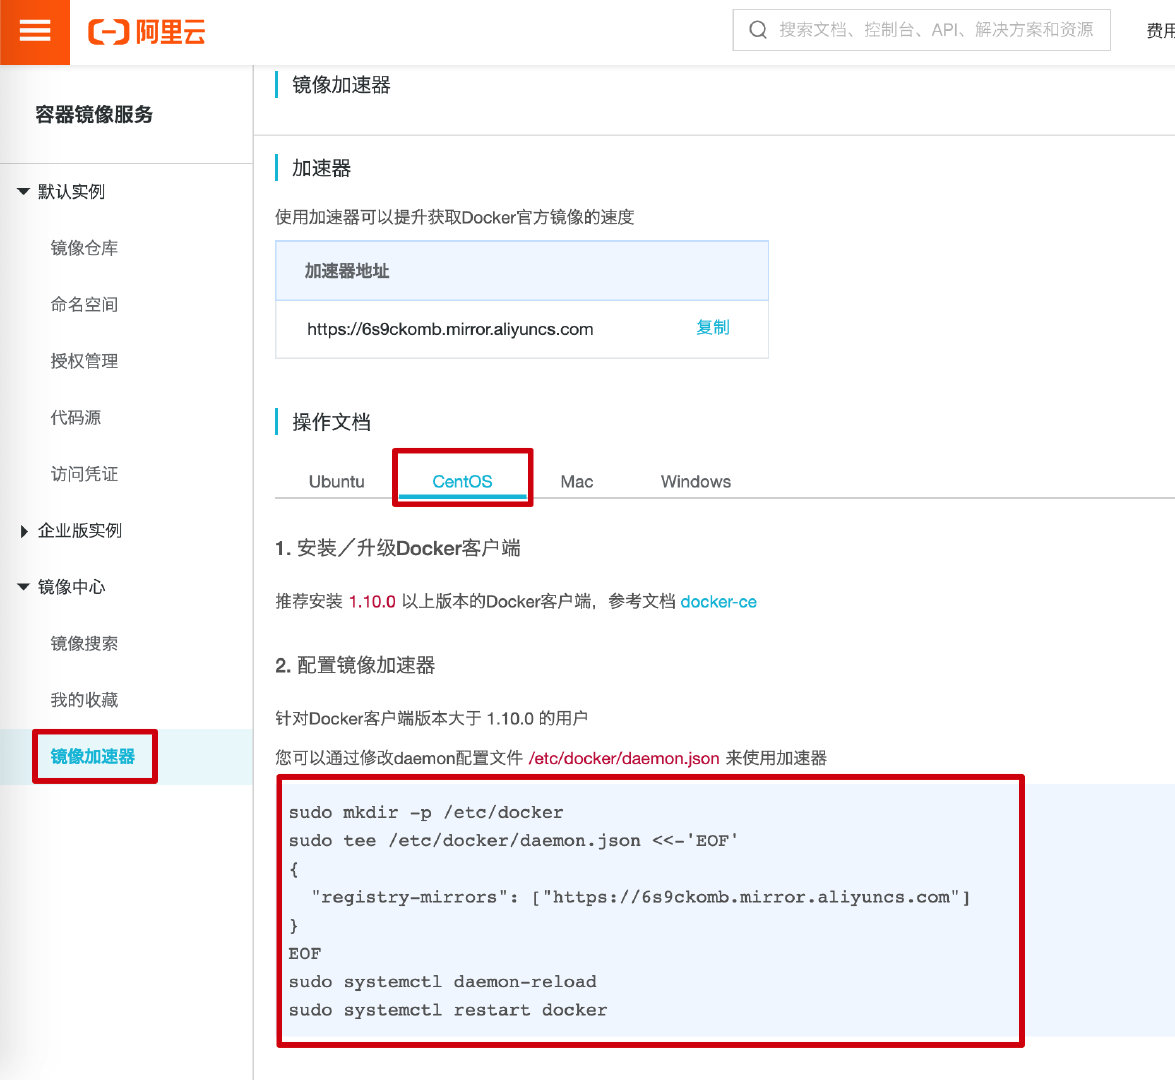
配置使用
1
2
3
4
5
6
7
8
9
10
11sudo mkdir -p /etc/docker
sudo tee /etc/docker/daemon.json <<-'EOF'
{
"registry-mirrors": ["https://6s9ckomb.mirror.aliyuncs.com"]
}
EOF
sudo systemctl daemon-reload
sudo systemctl restart docker
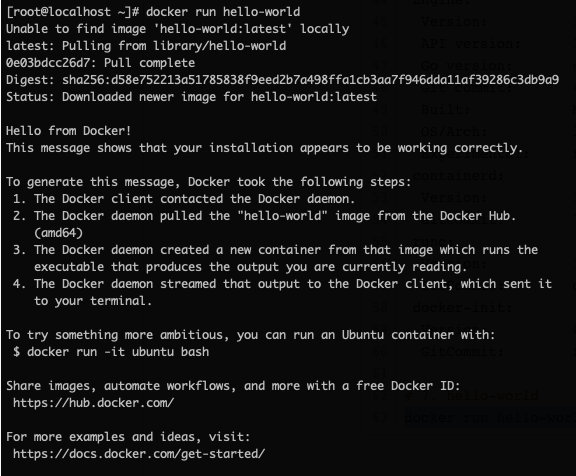
回顾 Hello-World 流程
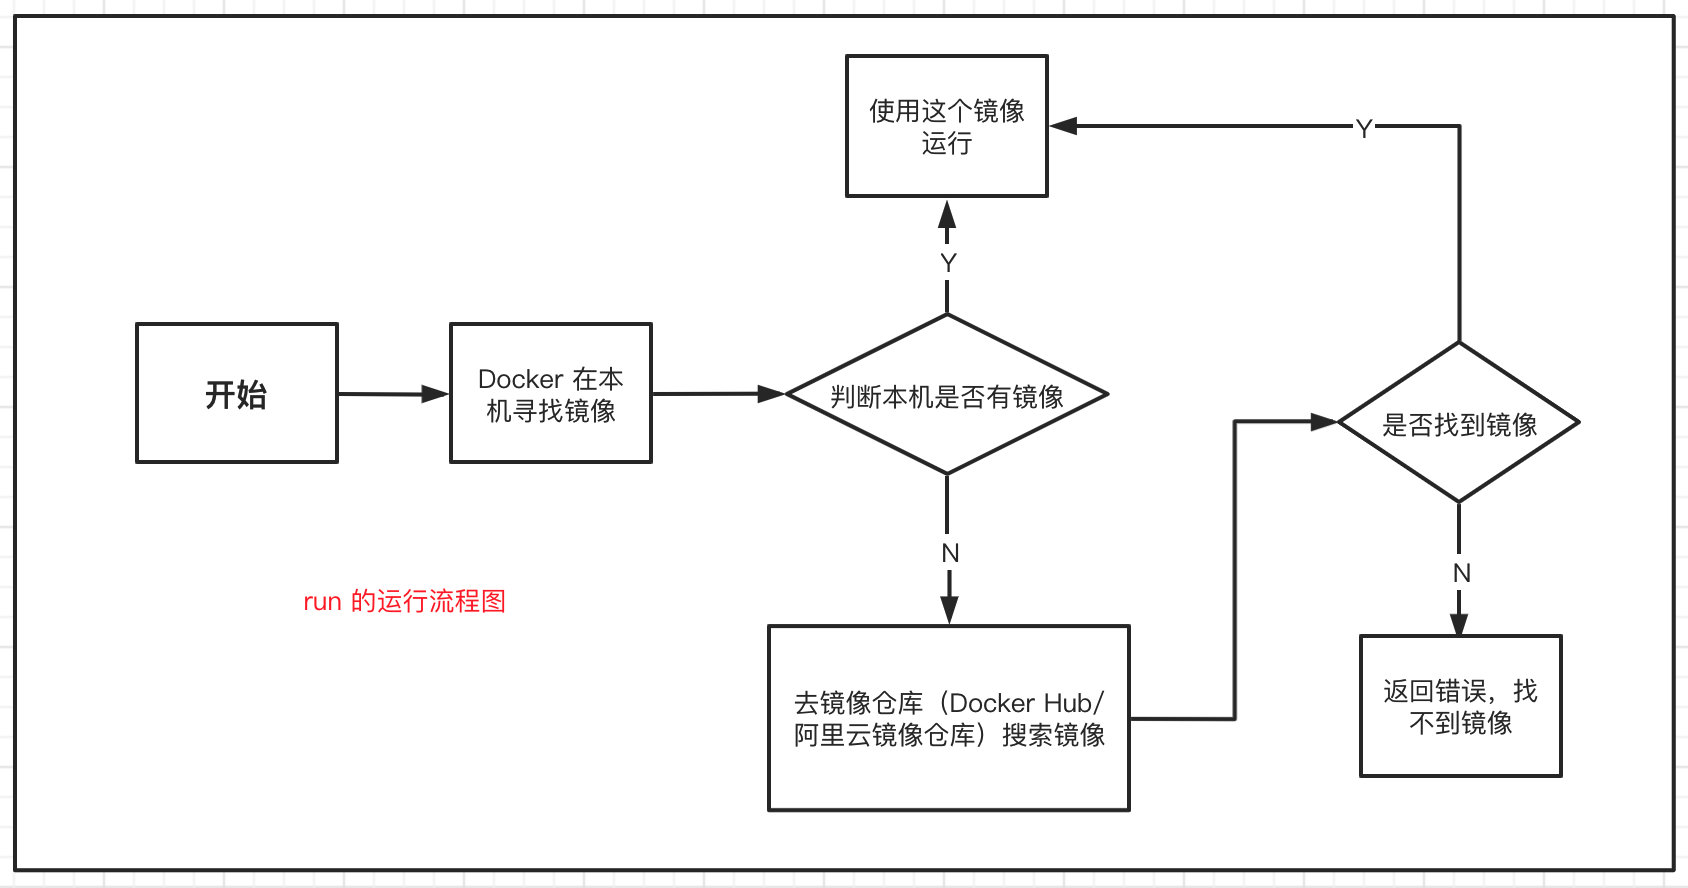
底层原理
Docker 是怎么工作的
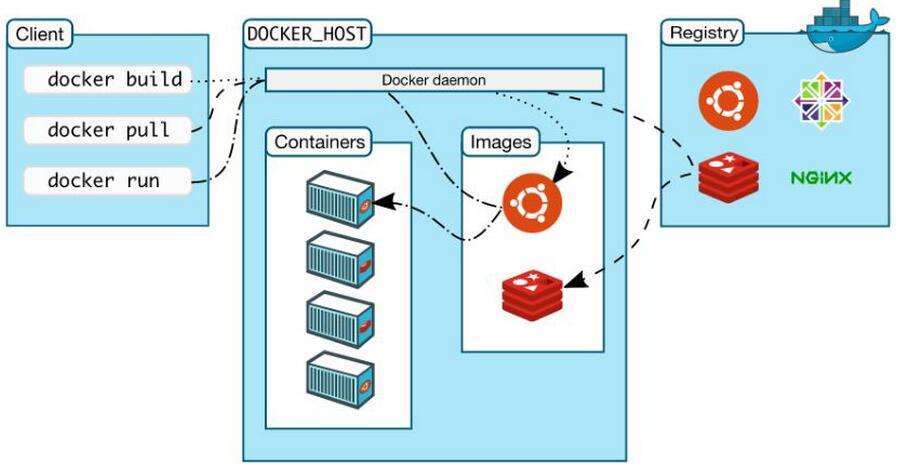
Docker 是一个 Client + Server 结构的系统,Docker 的守护进程运行在主机上,通过 Socket 从客户端访问
Docker Server 接收到 Docker Client 的指令,就会执行这个命令!
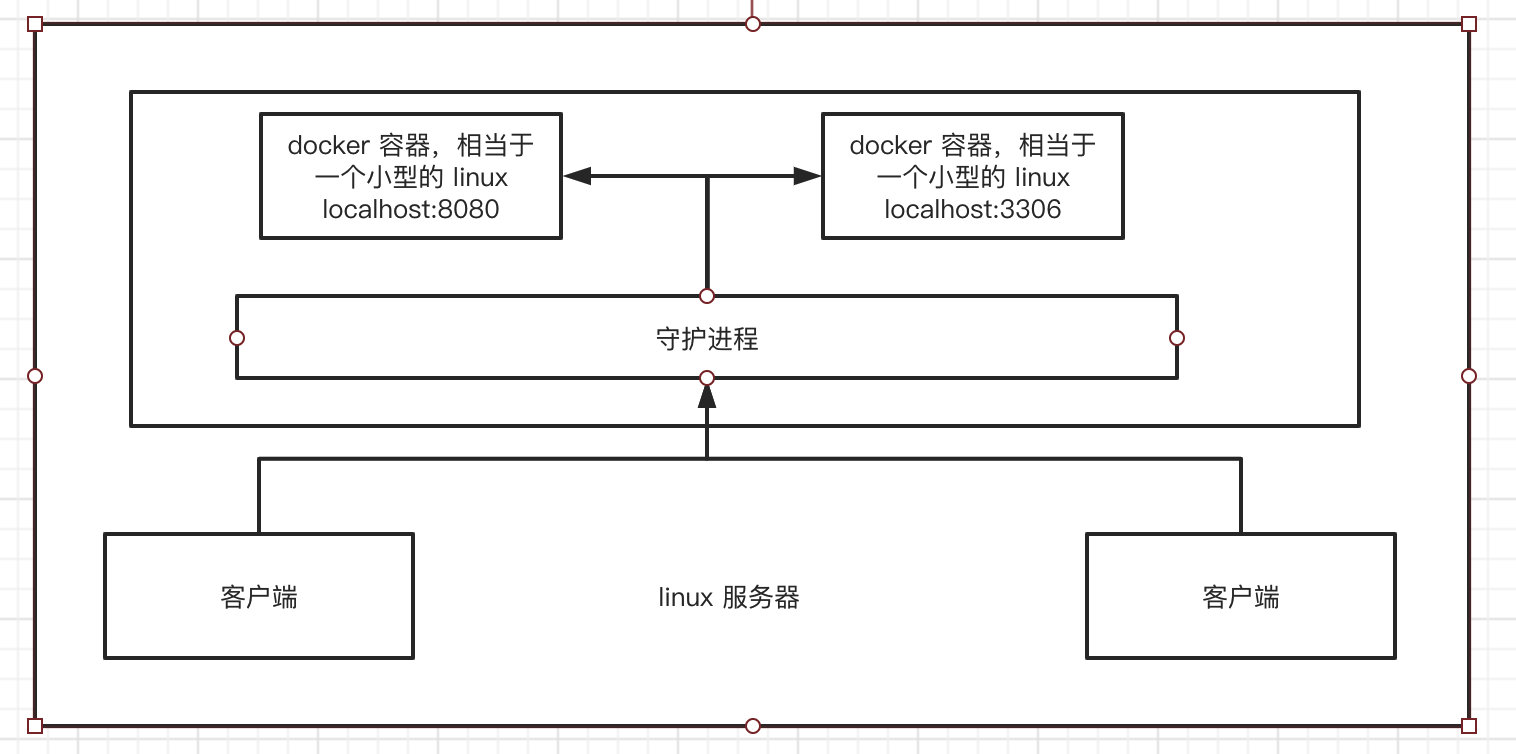
Docker 为什么比 VM 快?
- Docker 有比虚拟机更少的抽象层
- Docker 利用的是宿主机的内核,VM 需要的是 Guest OS

所以说,新建一个容器的时候,docker 不需要像虚拟机一样重新加载一个操作系统内核,避免引导。虚拟机是加载 Guest OS,分钟级别的,而 Docker 是利用宿主机的操作系统,省略了复杂的过程,秒级别。
Docker 的常用命令
帮助命令
1 | docker version # 显示 docker 的版本信息 |
帮助文档地址:https://docs.docker.com/reference/
镜像命令
docker images 查看本地的主机上的镜像
1 | [root@localhost ~]# docker images |
docker search 搜索镜像
1 | [root@localhost ~]# docker search mysql |
docker pull 下载镜像
1 | 下载镜像 docker pull 镜像名[:tag] |
docker rmi 删除镜像
1 | [root@localhost ~]# docker rmi -f 镜像id # 删除指定的镜像 |
容器命令
说明:有了镜像才可以创建容器
1 | docker pull centos |
新建容器并启动
1 | docker run [可选参数] iamge |
列出所有运行的容器
1 | docker ps |
退出容器
1 | exit # 停止并退出 |
删除容器
1 | docker rm 容器id # 删除指定的容器,不能删除正在运行的容器,如果要强制删除 rm -f |
启动和停止容器的操作
1 | docker start 容器id # 启动容器 |
其他常用命令
后台启动容器
1 | 命令 docker run -d 镜像名 |
查看日志
1 | docker logs -tf --tail 参数 容器 |
查看容器中进程信息
1 | docker top 容器id |
查看镜像的元数据
1 | [root@localhost ~]# docker inspect 6eaf349e79be |
进入当前运行的容器
1 | 容器通常都是使用后台运行的 |
从容器内拷贝文件到主机上
1 | [root@localhost ~]# docker ps |
小结
1 | attach Attach to a running container # 当前 shell 下 attach 连接指定运行镜像 |
Docker 镜像讲解
镜像是什么
镜像是一种轻量级、可执行的独立软件包,用来打包软件运行环境和基于运行环境开发的软件,它包含运行某个软件所需的所有内容,包括代码、运行时所需的库、环境变量和配置文件。
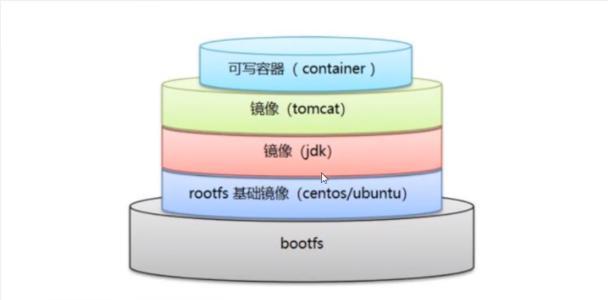
Docker 镜像加载原理
UnionFS(联合文件系统)
UnionFS(联合文件系统): Union文件系统(UnionFS)是一种分层、轻量级并且高性能的文件系统,它支持对文件系统的修改作为一次提交来一层层的叠加,同时可以将不同目录挂载到同一个虚拟文件系统下(unite several directories into a single virtual filesystem)。UnionFS 是 Docker 镜像的基础,镜像可以通过分层来进行继承,基于基础镜像(没有父镜像),可以制作各种具体的应用镜像
特性:一次同时加载多个文件系统,但从外面看起来,只能看到一个文件系统,联合加载会把各层文件系统叠加起来,这样最终的文件系统会包含所有底层的文件和目录
Docker 镜像加载原理
Docker 的镜像实际上有一层又一层的文件系统组成,这种层级的文件系统叫做 UnionFS。
bootfs(boot file system)主要包含 bootloader 和 kernel,bootloader 主要是引导加载 kernel,Linux 刚启动时会加载 bootfs 文件系统,在 Docker 镜像的最底层是 bootfs。这一层与我们典型的 Linux / Unix 系统是一样的,包含 boot 加载器和内核。当 boot 加载完成之后整个内核就存在内存中了,此时内存的使用权已由 bootfs 转交给内核,此时系统也会卸载 bootfs。
rootfs (root file system),在 bootfs 之上。包含的就是典型 Linux 系统中的 /dev ,/proc,/bin ,/etx 等标准的目录和文件。rootfs 就是各种不同的操作系统发行版。比如 Ubuntu,Centos 等等。
平时安装虚拟机的 Centos 都是好几个G,为什么 docker 里才200M?
1 | [root@localhost www]# docker images centos |
对于一个精简的OS,rootfs 可以很小,只需要包括最基本的命令、工具和程序库就可以了,因为底层直接用Host(宿主机)的 kernel,自己只需要提供 rootfs 就行了,由此可见对于不同的 Linux 发行版,bootfs 基本是一致的,rootfs 会有差别,因此不同的发行版可以公用 bootfs。
分层理解
分层的镜像
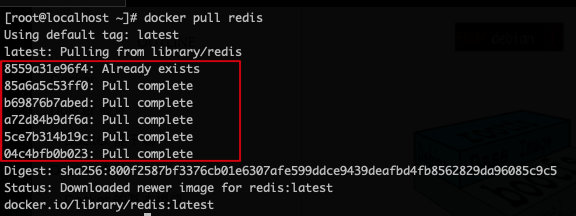
下载一个镜像,观察下载的日志输出,可以看到是一层一层的在下载
思考:为什么 Docker 镜像采用这种分层的结构呢?
资源共享!比如有多个镜像都是从相同的 base 镜像构建而来,那么宿主机只需要再磁盘上保留一份 base 镜像,同时内存中也只需要加载一份 base 镜像,这样就可以为所有容器服务了,而且镜像的每一层都可以被共享。
查看镜像的分层方式可以通过 docker image inspect 命令
1 | [root@localhost ~]# docker inspect redis |
理解:
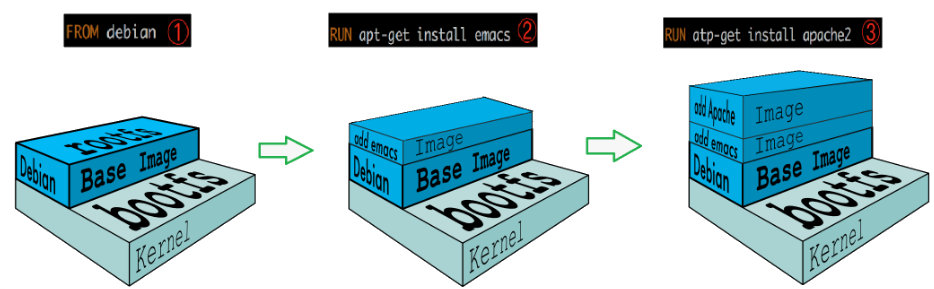
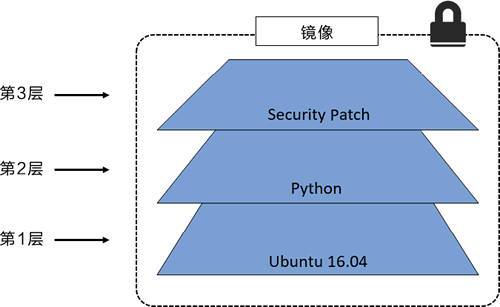
所有的 Docker 镜像都起始于一个基础镜像层,当进行修改或增加新的内容时,就会在当前镜像层之上,创建新的镜像层。
举一个简单的例子,假如基于 Ubuntu Linux 16.04 创建一个新的镜像,这就是新镜像的第一层;如果在该镜像中添加 Python 包,就会在基础镜像层之上创建第二个镜像层;如果继续添加一个安全补丁,就会创建第三个镜像层。
该镜像当前已经包含 3 个镜像层,如下图所示(这只是一个用于演示的很简单的例子)。
在添加额外的镜像层的同时,镜像始终保持是当前所有镜像的组合,理解这一点非常重要。下图中举了一个简单的例子,每个镜像层包含 3 个文件,而镜像包含了来自两个镜像层的 6 个文件。

上图中的镜像层跟之前图中的略有区别,主要目的是便于展示文件。
下图中展示了一个稍微复杂的三层镜像,在外部看来整个镜像只有 6 个文件,这是因为最上层中的文件 7 是文件 5 的一个更新版本。
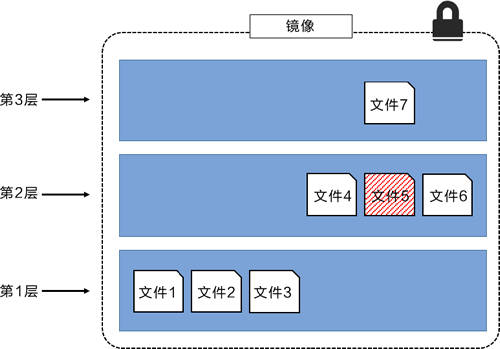
这种情况下,上层镜像层中的文件覆盖了底层镜像层中的文件。这样就使得文件的更新版本作为一个新镜像层添加到镜像当中。
Docker 通过存储引擎(新版本采用快照机制)的方式来实现镜像层堆栈,并保证多镜像层对外展示为统一的文件系统。
Linux 上可用的存储引擎有 AUFS、Overlay2、Device Mapper、Btrfs 以及 ZFS。顾名思义,每种存储引擎都基于 Linux 中对应的文件系统或者块设备技术,并且每种存储引擎都有其独有的性能特点。
Docker 在 Windows 上仅支持 windowsfilter 一种存储引擎,该引擎基于 NTFS 文件系统之上实现了分层和 CoW[1]。
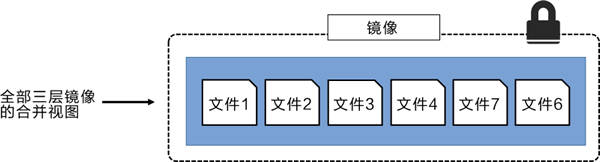
下图展示了与系统显示相同的三层镜像。所有镜像层堆叠并合并,对外提供统一的视图。
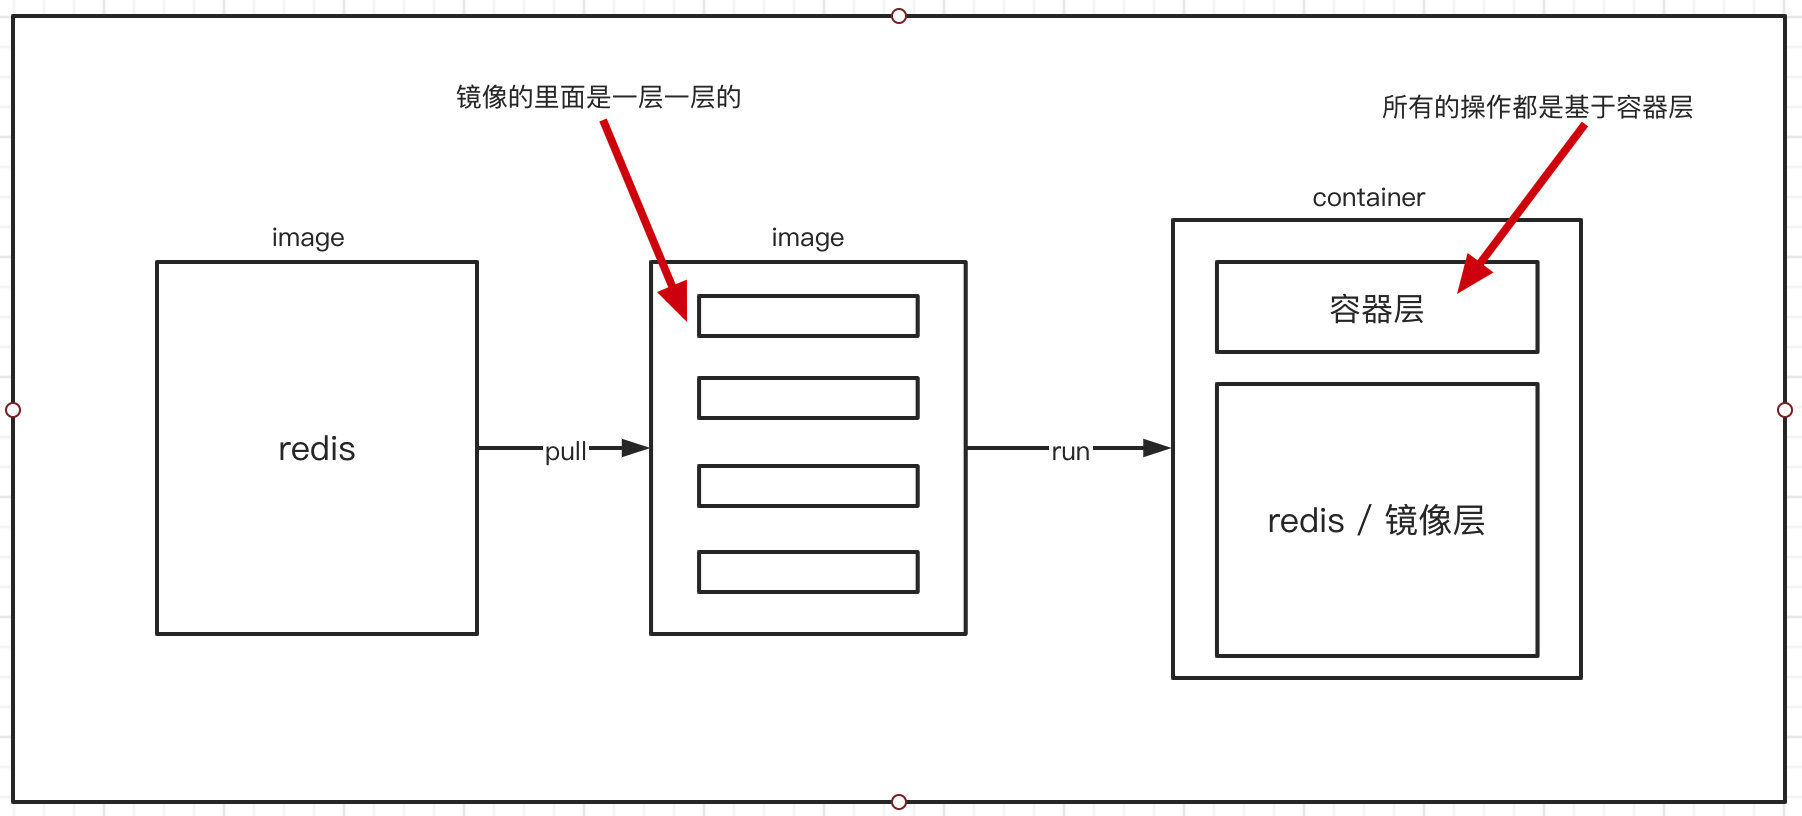
特点
Dokcer 镜像都是只读的,当容器启动时,一个新的可写层会被加载到镜像的顶部!
新加的一层就是容器层,容器层之下的叫做镜像层
Commit 镜像
1 | docker commit 提交容器成为一个新的副本 |
测试:
1 | 1. 启动一个默认 tomcat |
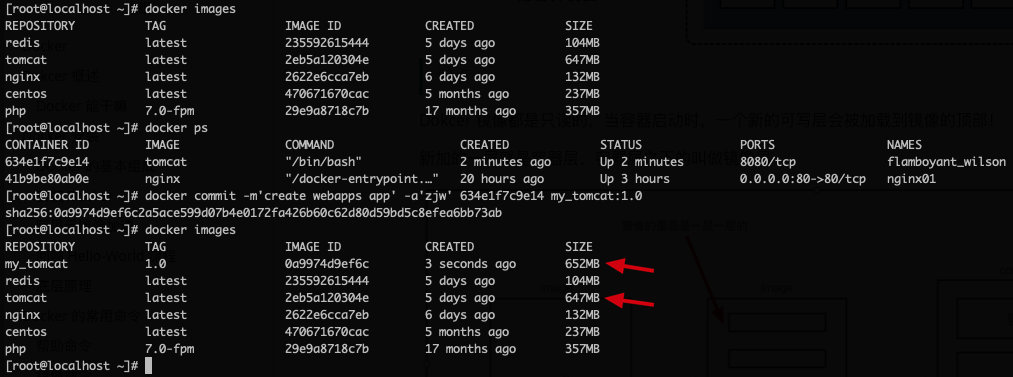
如果想保存当前容器的状态,就可以通过 commit 来提交,保存成为一个镜像。类似于虚拟机的快照,可以通过镜像的 tag 来标注信息
容器数据卷
什么是容器数据卷
数据保存再容器中,如果容器删除,数据就会丢失,需求:数据可以持久化
容器之间可以有一个数据共享的技术,Docker 容器中产生的数据,同步到本地(目录的挂载,将容器的目录,挂载到 Linux 上)

使用数据卷
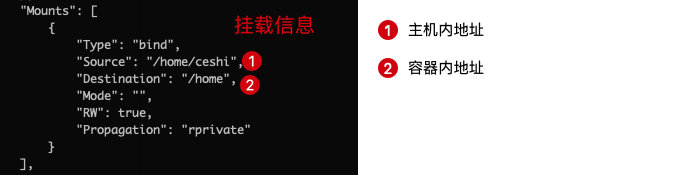
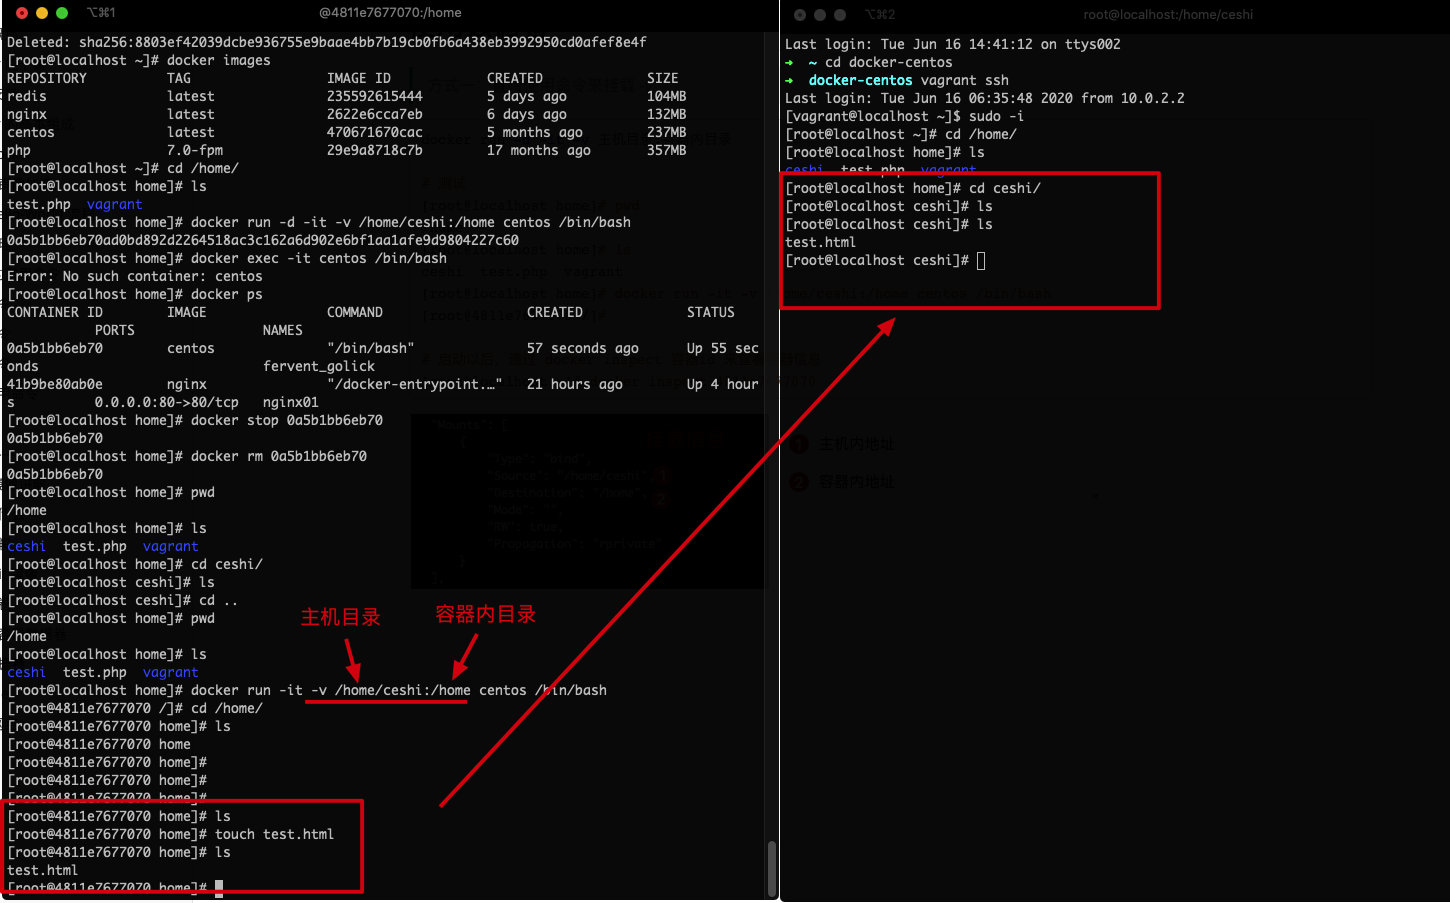
方式一:直接使用命令来挂载 -v
1 | docker run -d -it -v 主机目录:容器内目录 |
 ‘’
‘’
测试文件同步
安装 MySQL
1 | 获取镜像 |
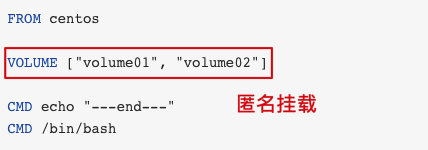
具名和匿名挂载
1 | 匿名挂载 |
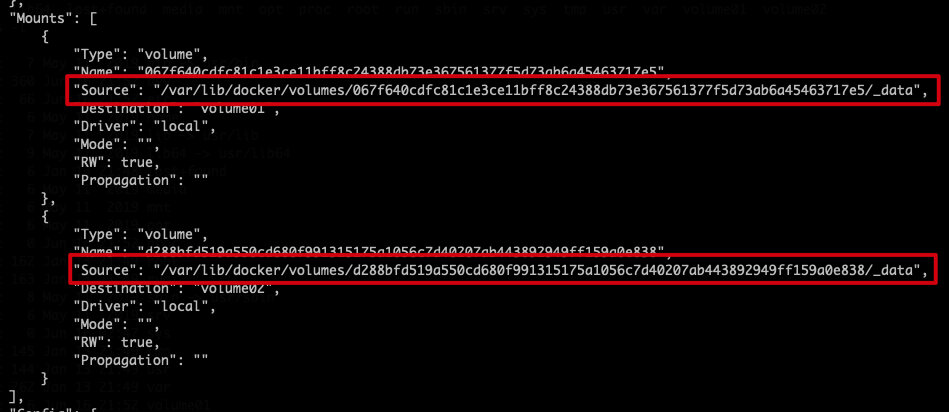
所有的 docker 容器内的卷,没有指定目录的情况下都在 /var/lib/docker/volumes/xxx/_data
使用具名挂载可以方便的找到卷,大多数情况下都是使用 具名挂载
1 | 总结 |
拓展:
1 | 通过 -v 容器内路径:ro rw 改变读写权限 |
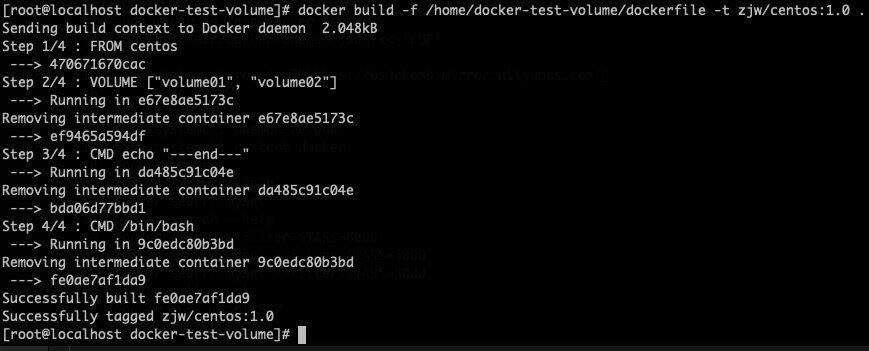
初始 DockerFile
DockerFile 就是用来构建 docker 镜像的构建文件,是一个脚本文件
通过这个脚本可以生成镜像,镜像是一层一层的,脚本中的每一个命令,都是一层
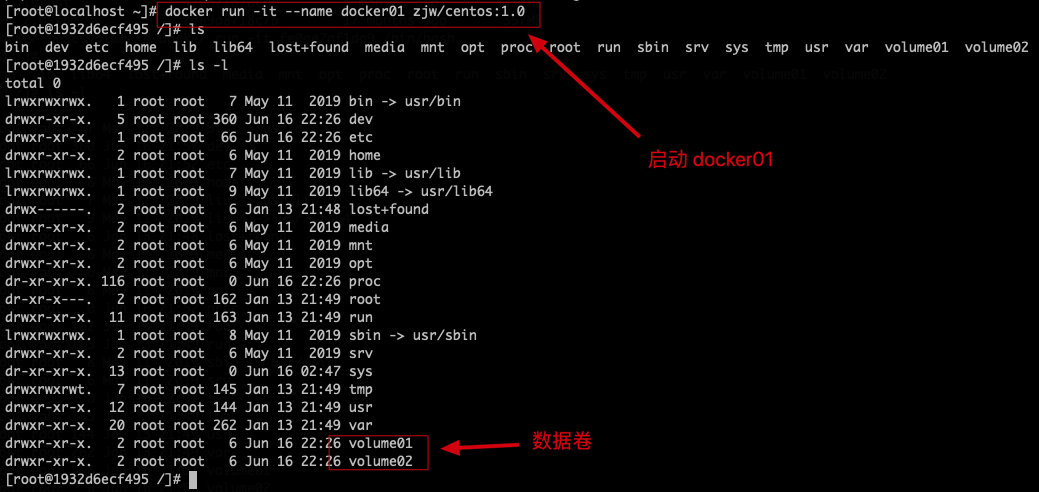
1 | # 创建一个 dockerfile 文件,名字随机,建议 Dockfile |
1 | 启动容器 |
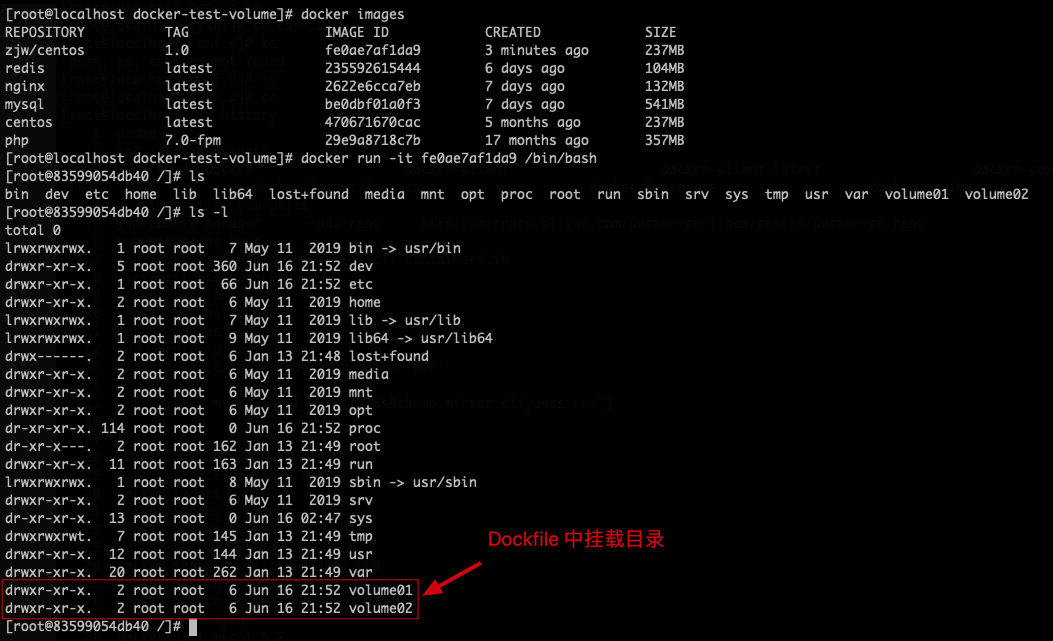
这个挂载的目录就是数据卷目录,在外部一定有一个同步的挂载目录
查看卷信息
测试一下文件是否同步
1 | 容器内 |
数据卷容器
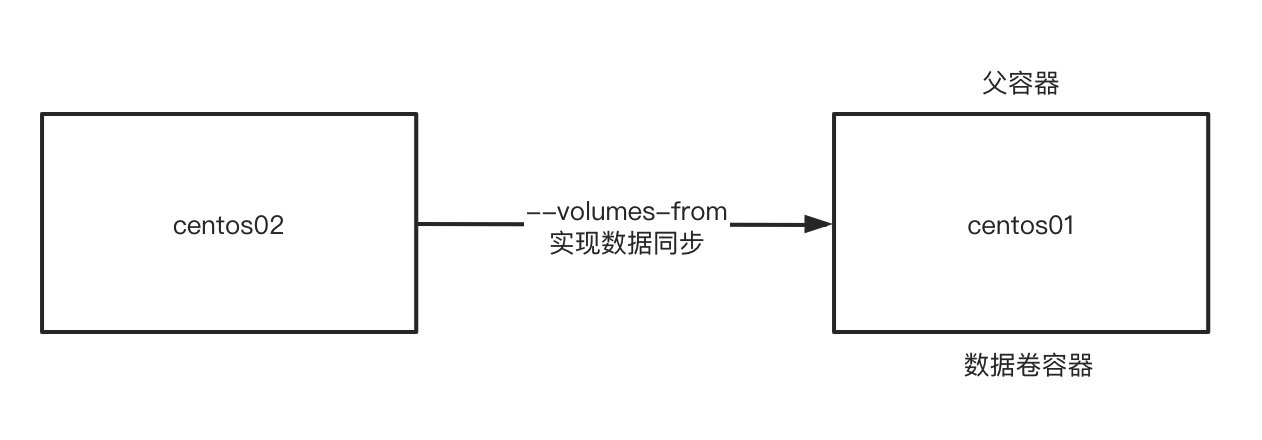
1 | 启动三个容器 |
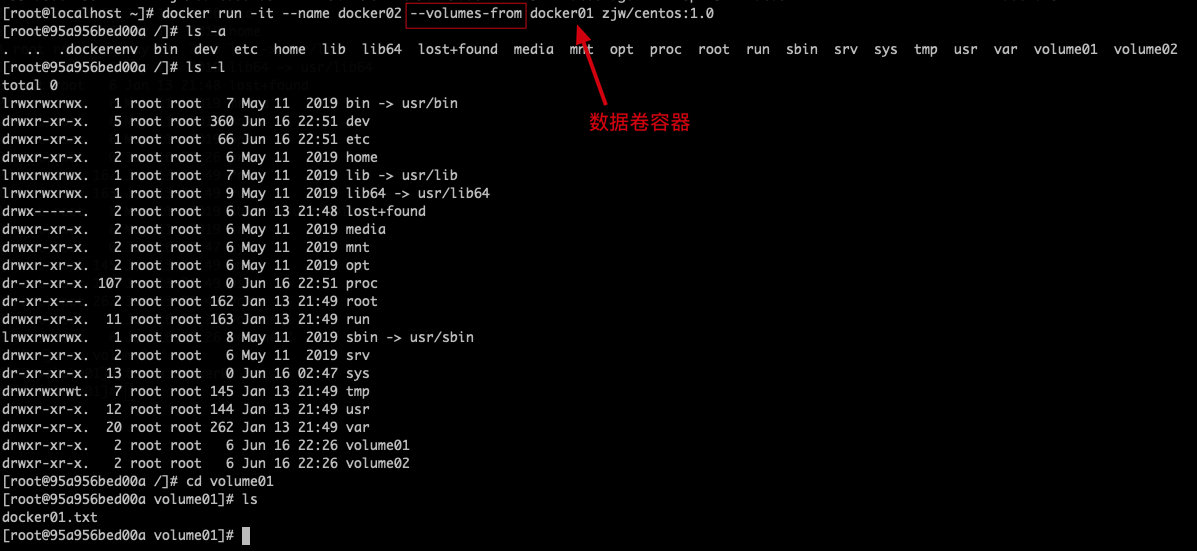
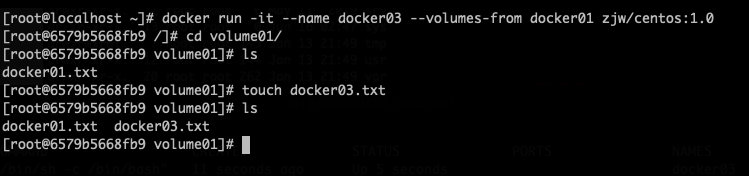
1 | 测试,删除 docker01 后,docker02、docker03 依旧可以访问文件,数据卷容器是拷贝的概念 |
结论:
容器之间配置信息的传递,数据卷容器的生命周期一直持续到没有容器使用为止
一旦持久化到到了本地,那么即使容器删除,本地的数据也是不会消失的
DockerFile
DockerFile 介绍
dockfile 是用来构建镜像的脚本文件
构建步骤
- 编写一个 dockerfile 文件
- docker build 构建一个镜像
- docker run 运行镜像
- docker push 发布镜像(DockerHub、阿里云仓库)
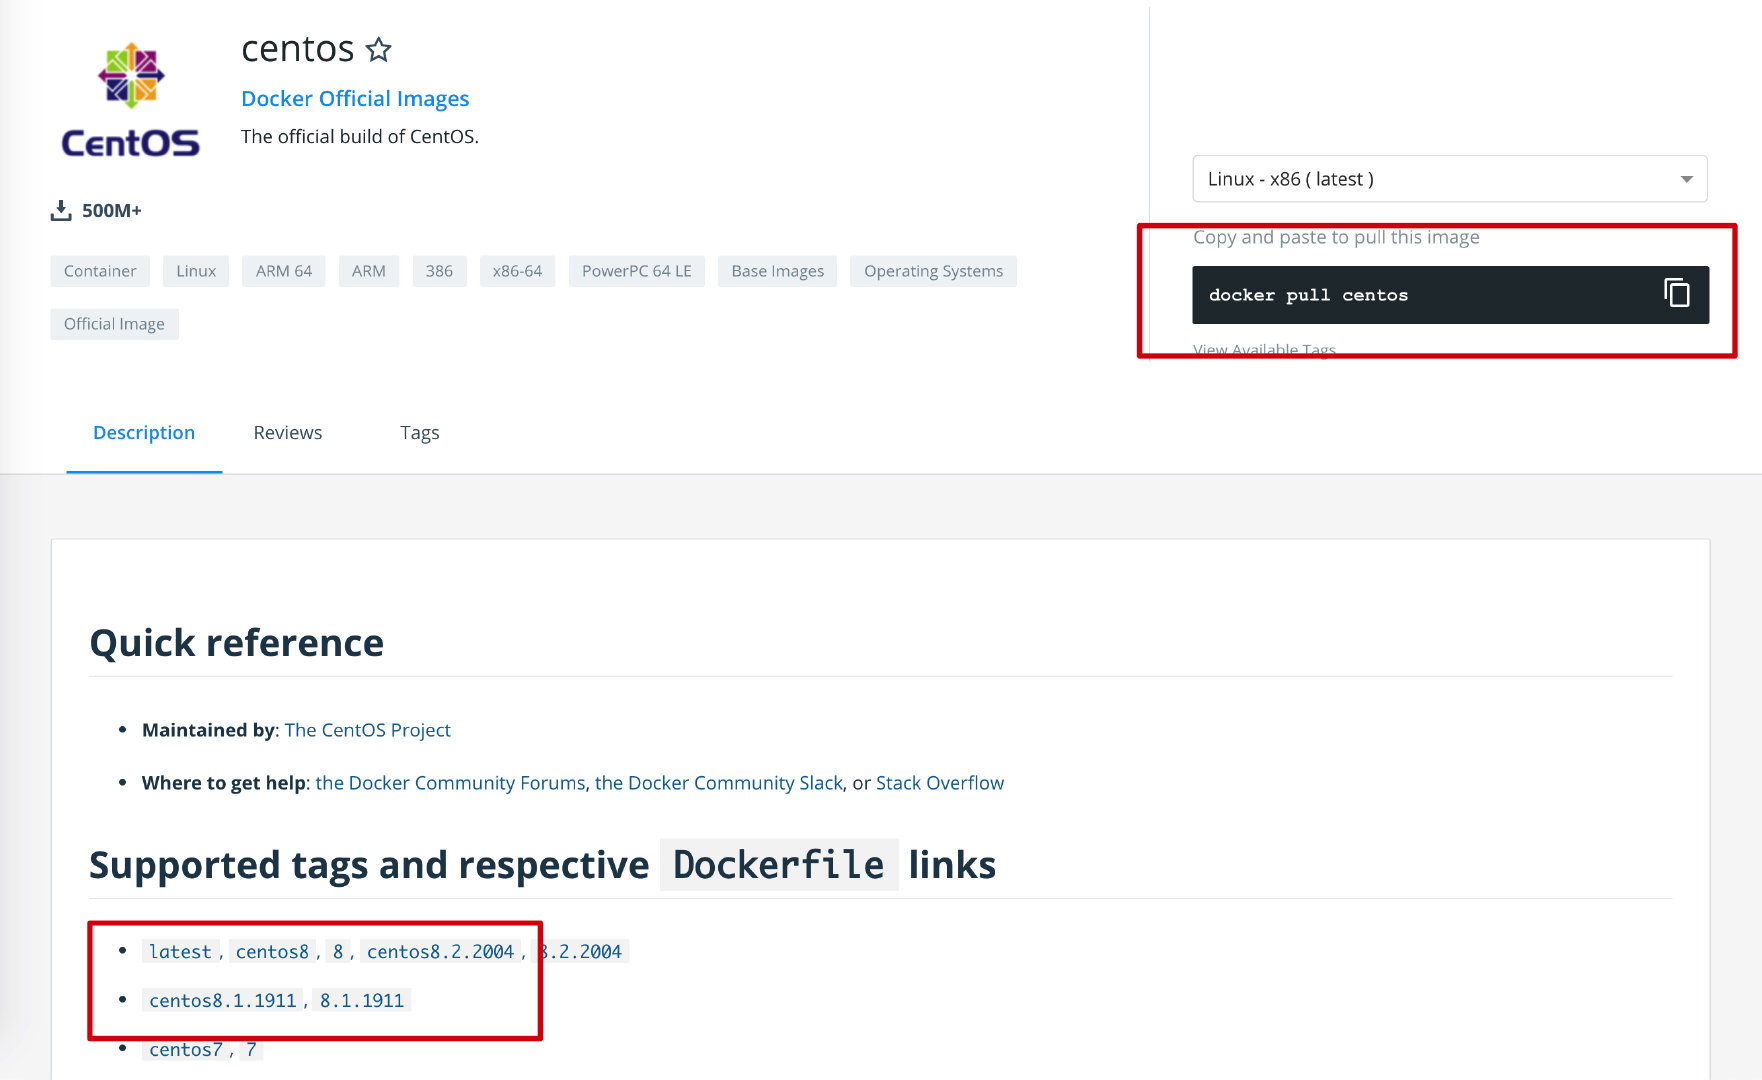
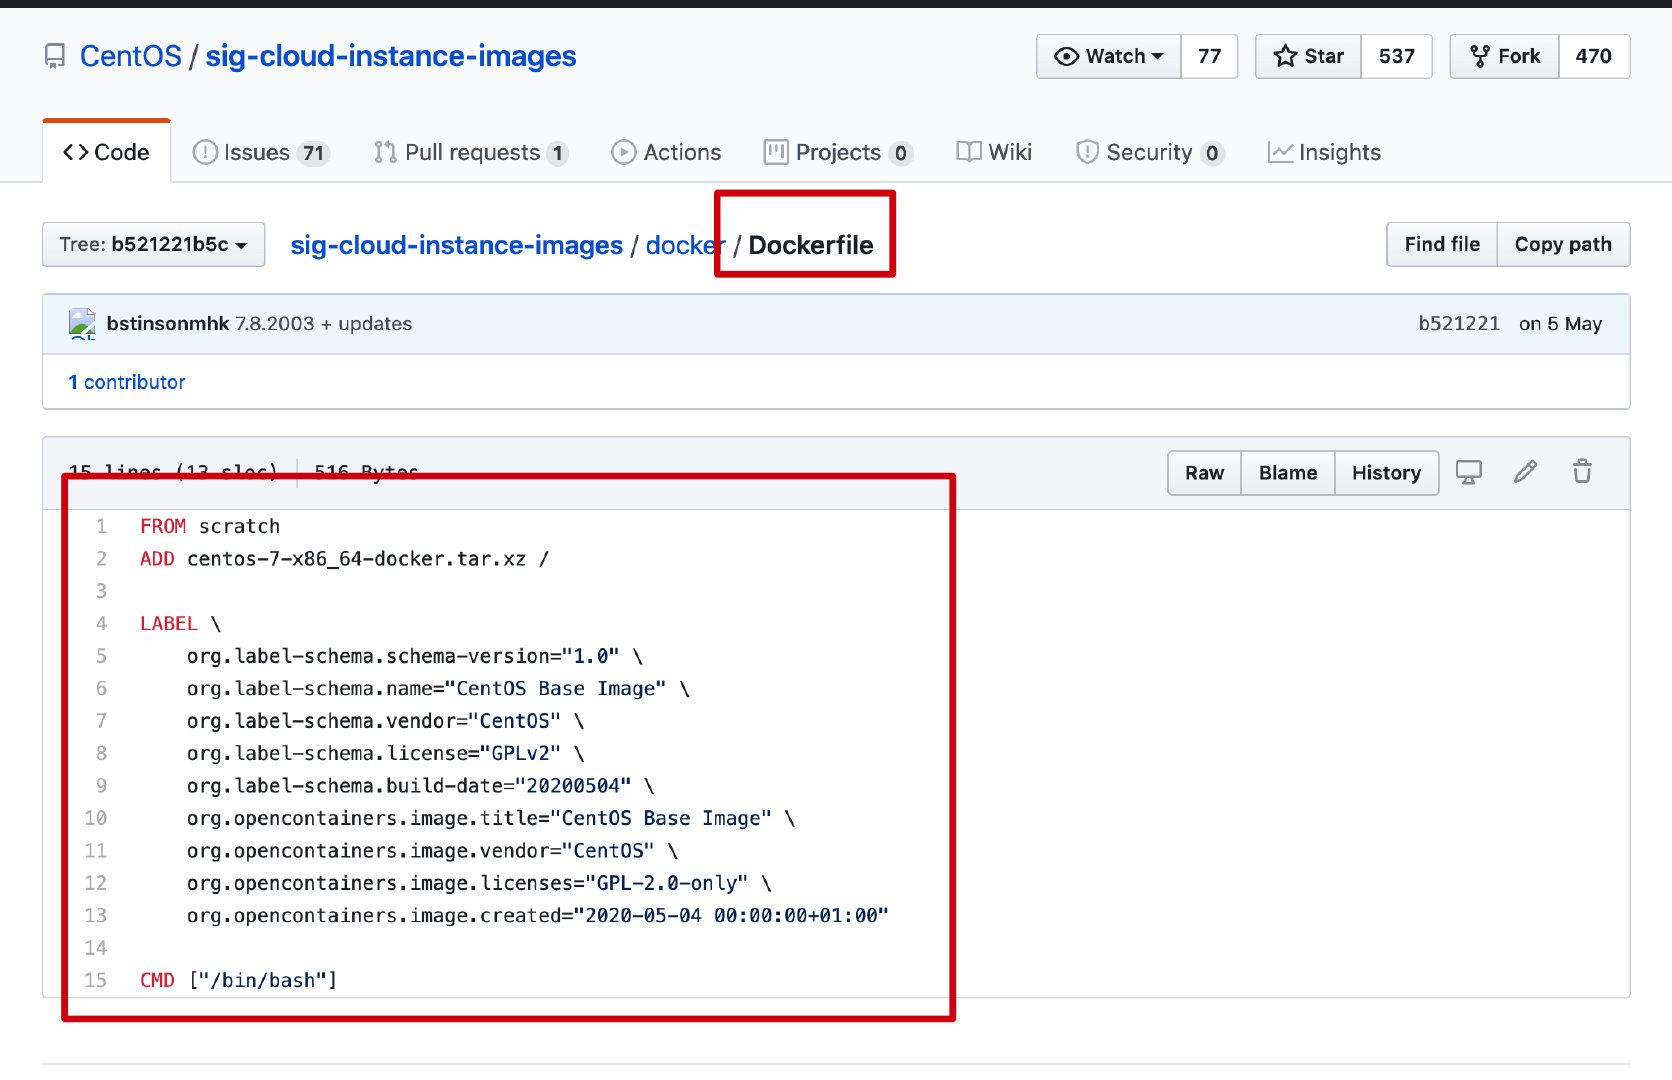
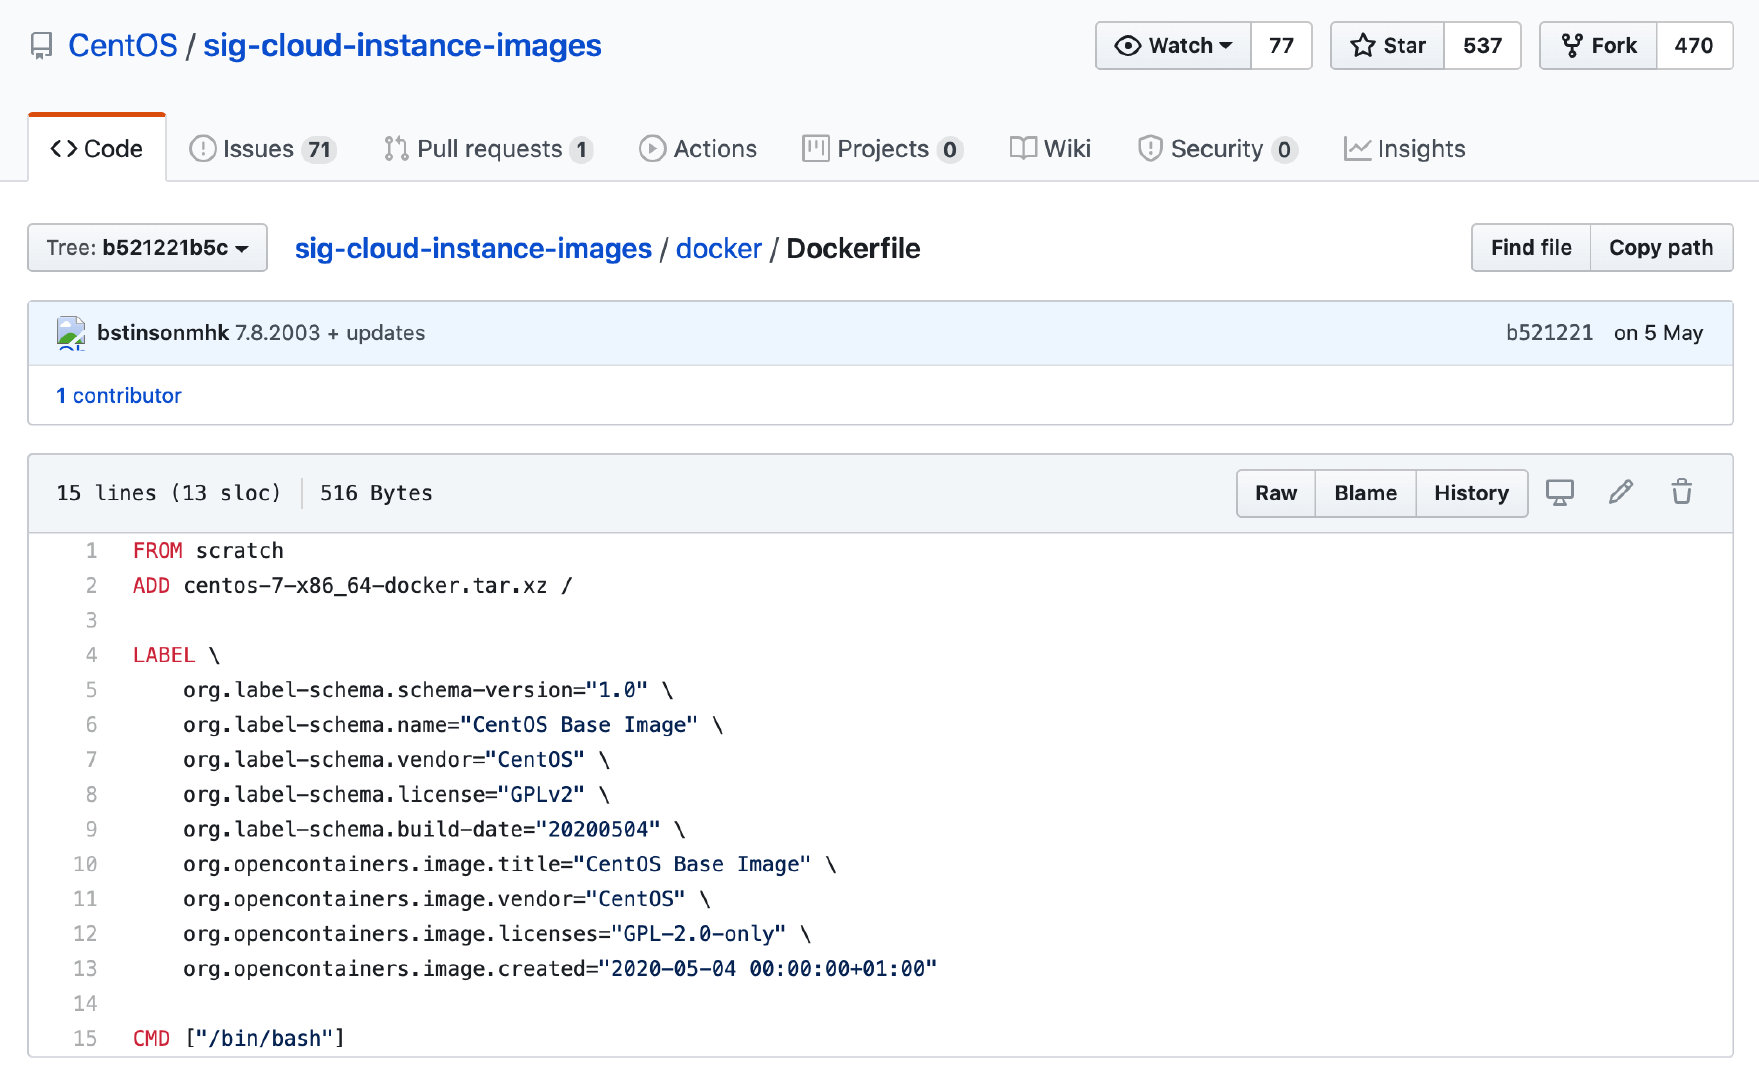
看一下官方 CentOS 是怎么做的
很多官方的镜像都是基础包,很多功能没有,只有最底层的命令,我要需要自己搭建个性化镜像
DockerFile 构建过程
基础知识:
- 每个保留关键字(指令)都必须大写
- 执行从上到下顺序执行
- # 表示注释
- 每一个指令都会创建提交一个新的镜像层
Dockerfile 是面向开发的,以后我们要发布项目,做镜像,就要编写 Dockerfile
步骤:
DockerFile:构建文件,定义了一切的步骤,是源代码
DockerImage:通过 DockFile 构建生成的镜像,最终运行发布的产品
Docker容器:镜像运行起来以后提供服务
DockerFIle 指令说明
1 | FROM # 基础镜像,一切从这里开始构建 |

实战测试
DockerHub 中 99% 的镜像都是从 FROM scratch 基础包开始的
创建一个自己的 CentOS
1 | 1. 编写一个自己的 DockerFile |
对比之前的 CentOS
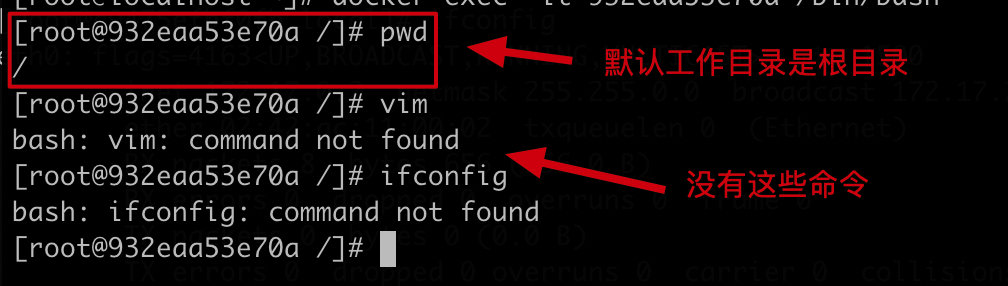
自己编写 DockerFile 构建的 CentOS

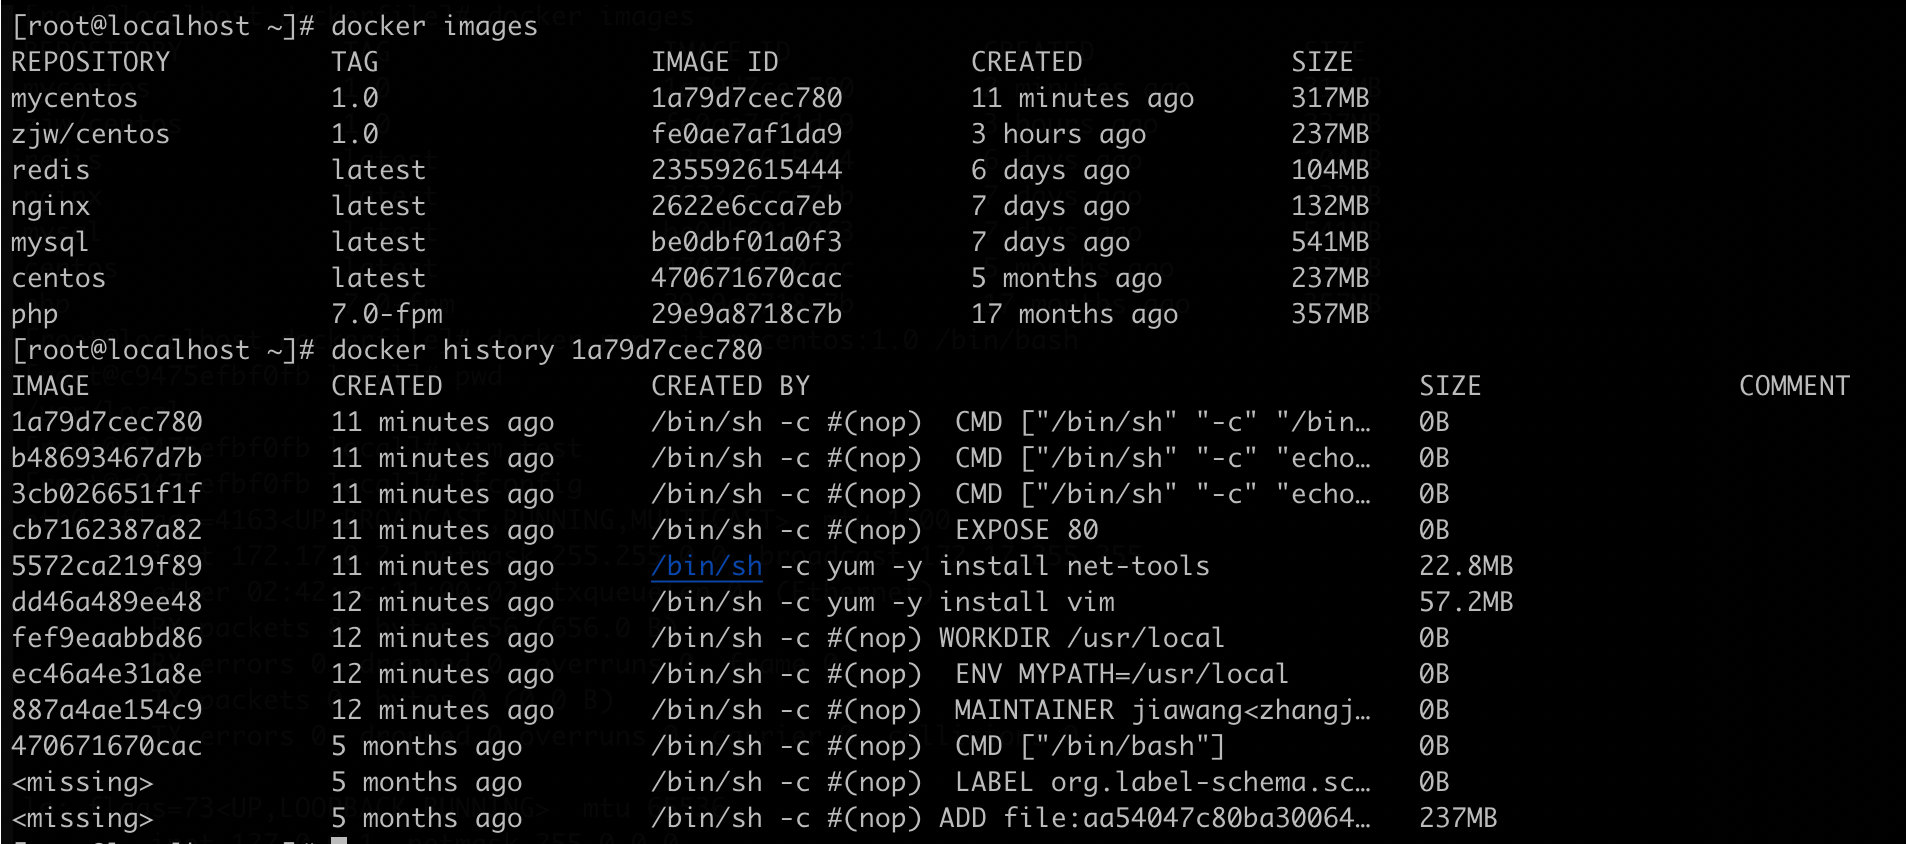
可以通过 docker history 来查看镜像构建历史
CMD 和 ENTRYPOINT 的区别
1 | CMD # 指定容器启动的时候要运行的命令,只有最后一个会生效,可被替代 |
测试 CMD
1 | 编写 dockerfile |
测试 ENTRYPOINT
1 | 编写 dockerfile |
dockerfile 文件建议使用官方命名:Dockerfile,这样在 build 的时候就不用 -f 参数了
发布自己的镜像
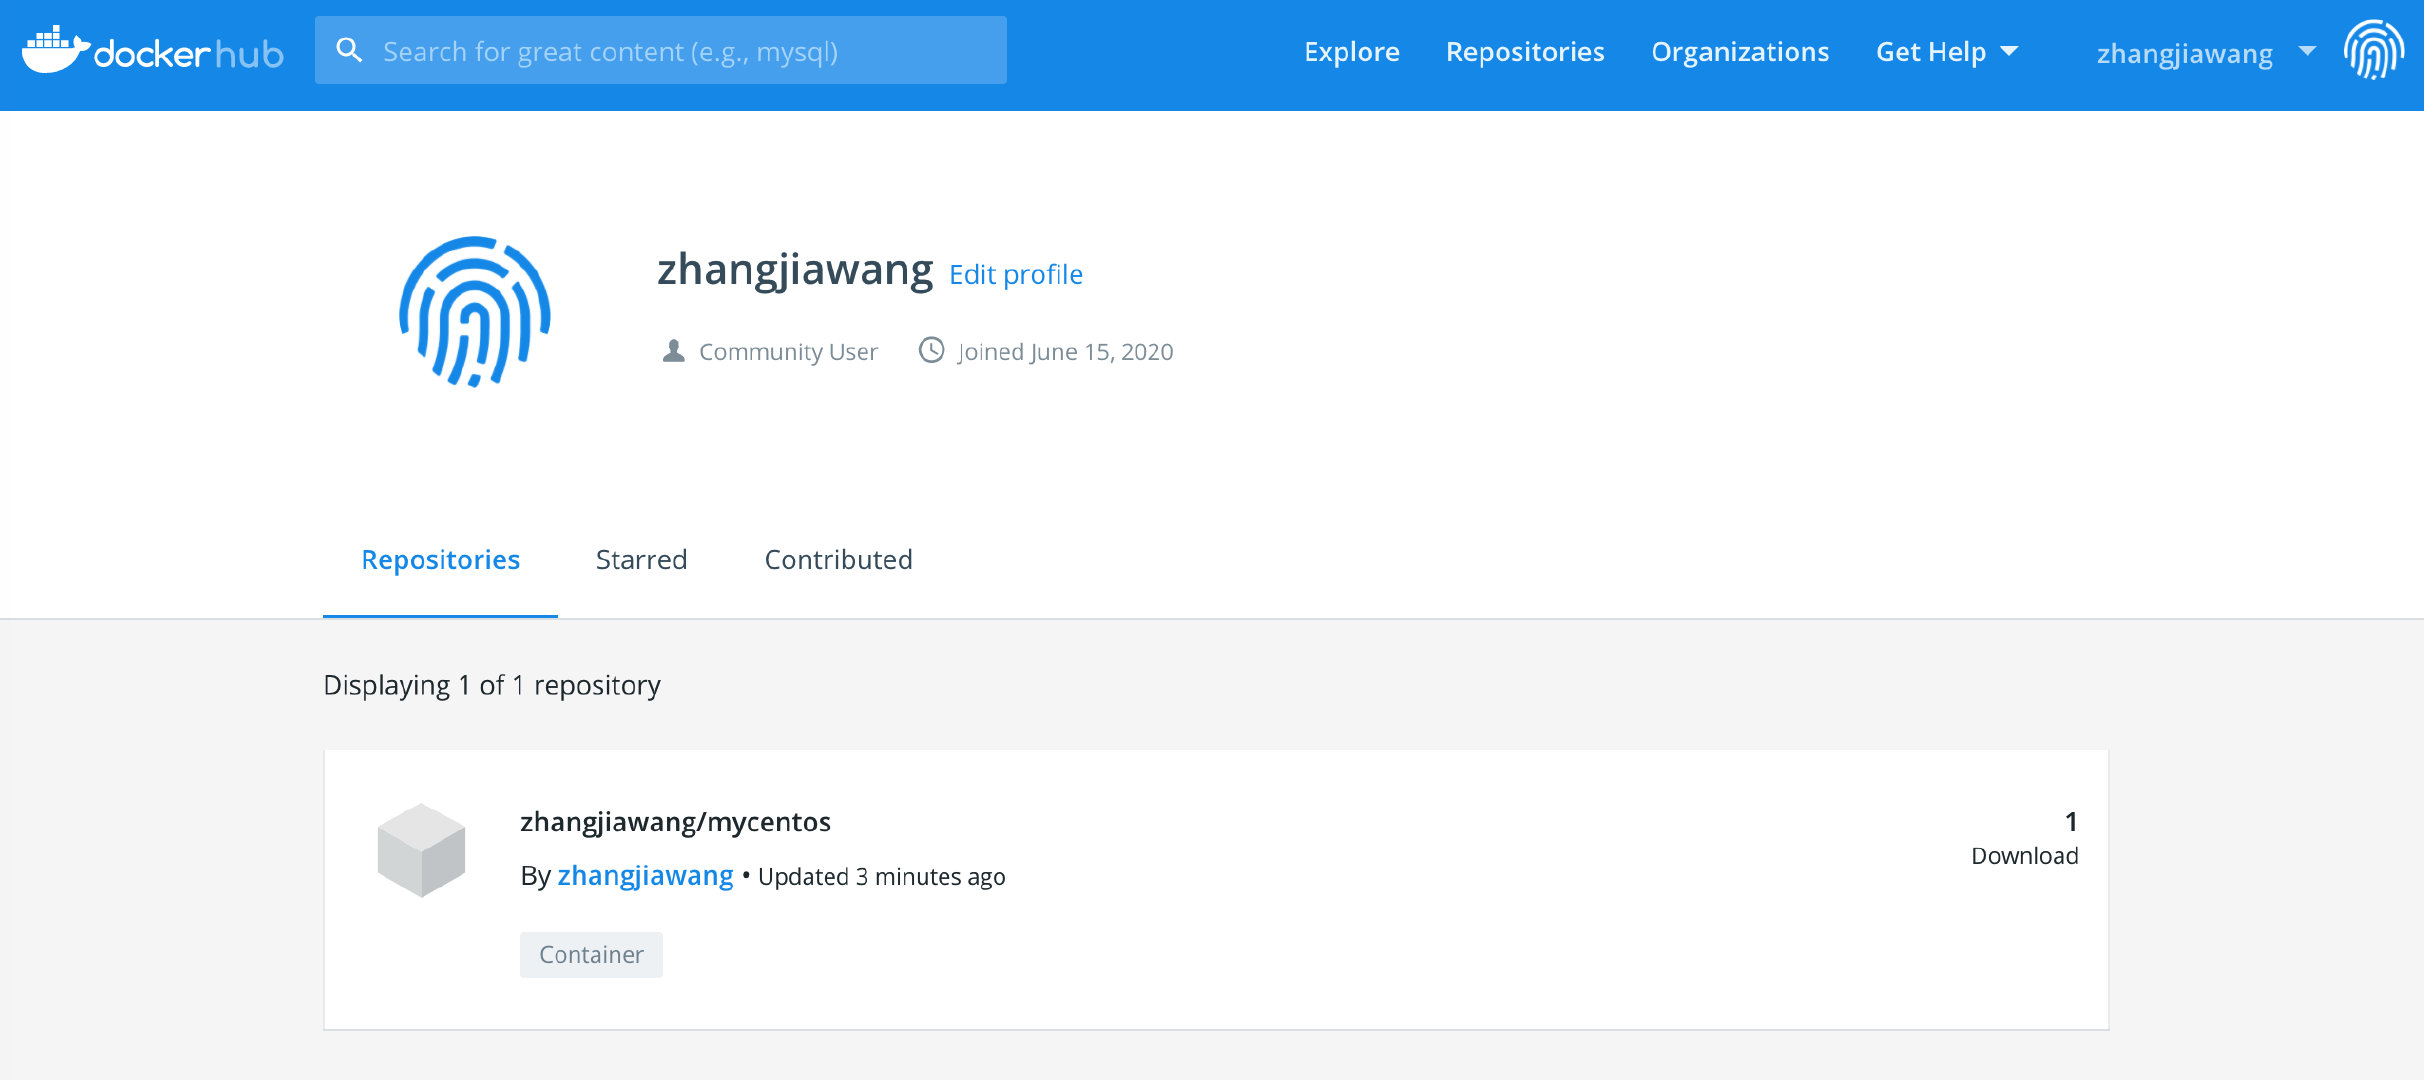
DockerHub
注册账号
提交自己的镜像到 DockerHub 服务器
1 | [root@localhost dockerfile]# docker login --help |
- 登录 DockerHub 账号,并提交镜像 docker push
1 | [root@localhost dockerfile]# docker login -u zhangjiawang |
可以在自己的 DockerHub 仓库看到刚刚提交的镜像
阿里云镜像服务器
- 登录阿里云账号
- 创建命名空间

- 创建镜像仓库

- 查看镜像仓库信息
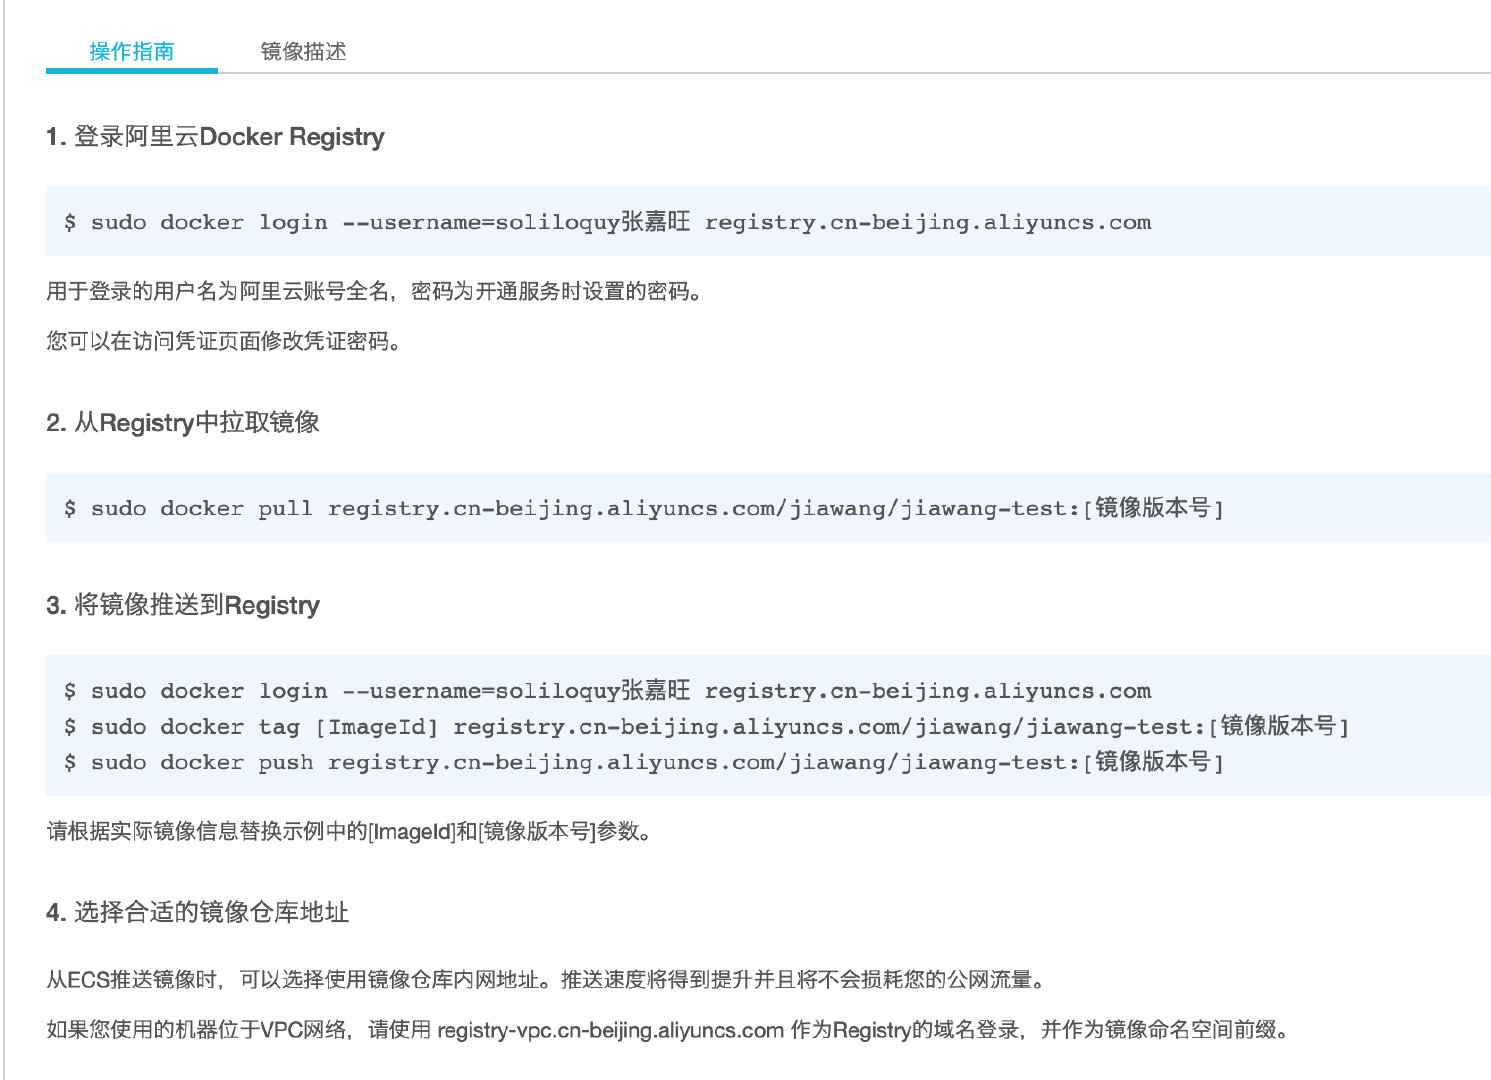
- 参考官方操作指南,即可成功推送到阿里云镜像服务
小结
Docker 网络
理解 Docker0
docker 是如何处理容器网络访问的
1 | [root@localhost ~]# docker run -d -P --name tomcat01 tomcat |
原理
1、我们每启动一个 docker 容器,docker 就会给容器分配一个ip,只要安装了 docker,就会有一个 docker0 网卡(桥接模式,使用的是 veth-pair 技术)
查看主机上的 ip addr
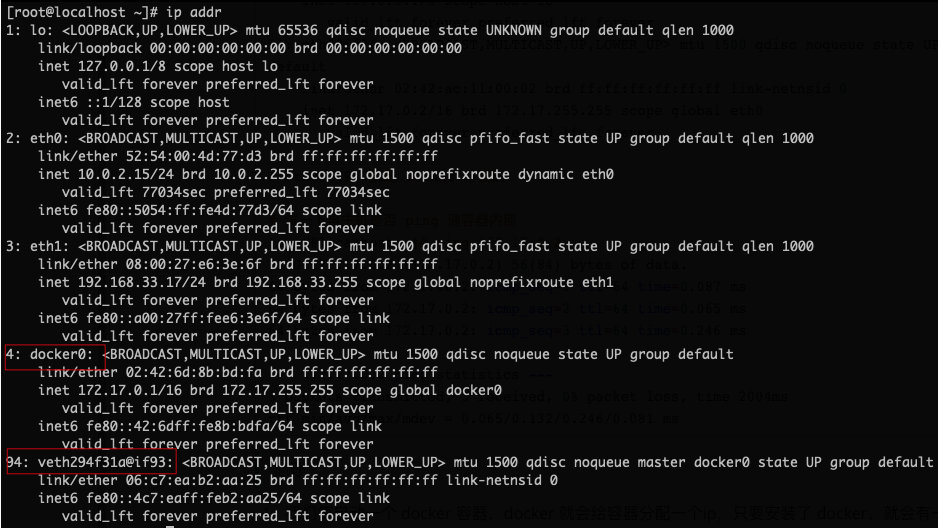
2、再启动一个容器
1 | [root@localhost ~]# docker run -d -P --name tomcat02 tomcat |
再次查看主机上的 ip addr

1 | 发现容器和主机上的网卡是一对一对相对应的 |
3、测试 tomcat01 和 tomcat02 是否 ping 通
1 | [root@localhost ~]# docker exec -it tomcat02 ping 172.17.0.2 |
以上的网络模型图
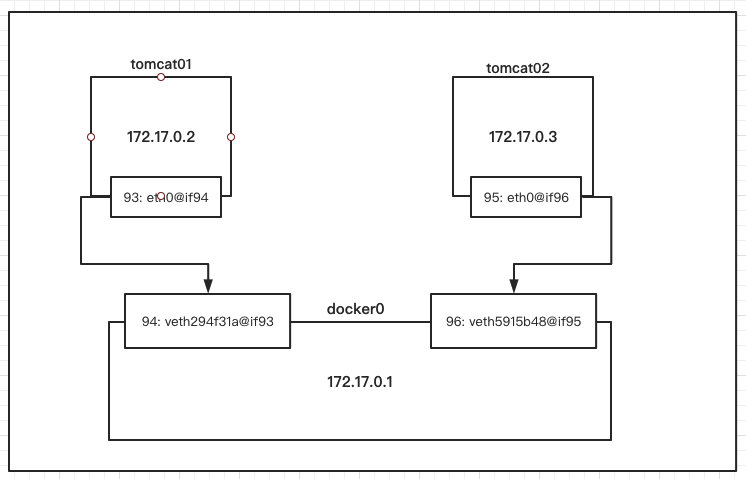
结论: tomcat01 和 tomcat02 公用一个路由器(docker0)
所有容器不指定网络的情况下,都是 docker0 路由的,会给每个容器分配一个可以 IP
Docker 使用的是 Linux 的桥接,宿主机是一个 docker 容器的网桥
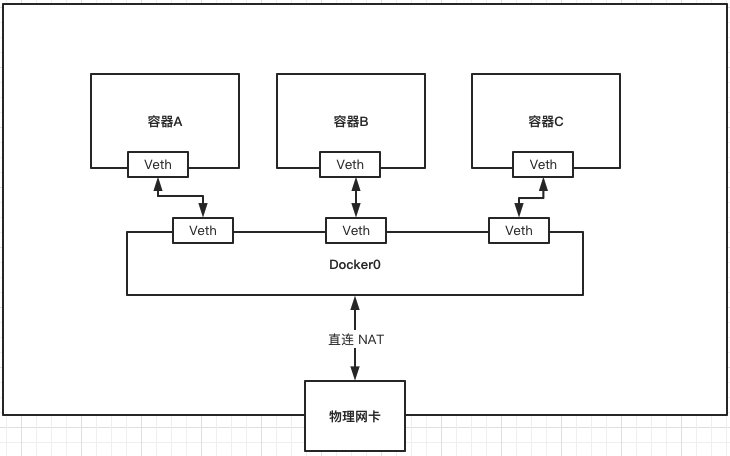
Docker 中的所有网络接口都是虚拟的,虚拟转发效率高
只要容器删除,对应的一对网卡就会自动删除
–link
容器与容器之间使用 name 可以 ping 通吗?
1 | [root@localhost ~]# docker ps |
其本质就是在 tomcat03 的 /etc/hosts 文件增加了 tomcat02 的绑定
自定义网络
查看所有的 docker 网络
1 | [root@localhost ~]# docker network ls |
网络模式:
brige:桥接 docker默认
None:不配置网络
Host:和宿主机共享网络
Container:容器网络联通(不常用)
测试:
1 | 我们启动容器时,其实会有一段默认参数 --net bridge 这个就是 docker0 |
自定义网络 docker 已经维护好了对应关系
好处:
redis / mysql - 不同的集群使用不同的网络,保证集群是安全和健康的
网络连通
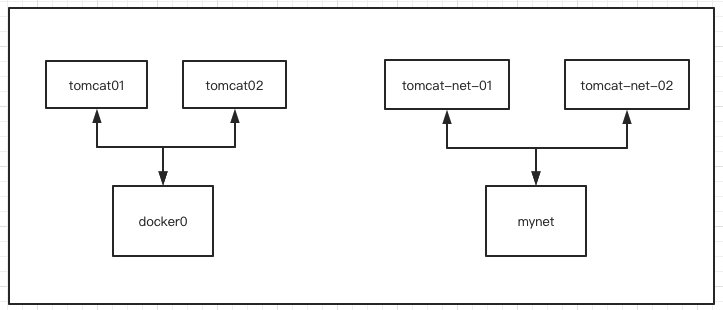
按照图片搭建容器
查看容器:

1 | 这个时候使用 tomcat01 是无法联通 tomcat-net-01 的 |
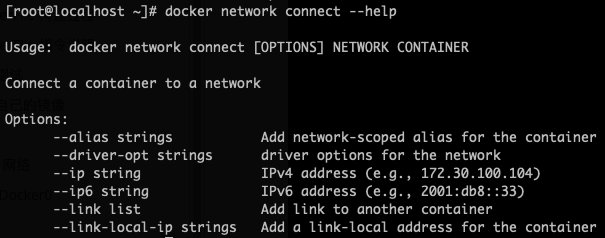
1 | 测试 打通 tomcat01 - mynet |
该笔记整理与 B 站 up 主:狂神说Java
完整视频地址: https://www.bilibili.com/video/BV1S54y1R7SB
感谢狂神!
 微信
微信 支付宝
支付宝